
| Public Health Technician (MSF, 1994, 192 p.) | ||||
| 1. Water in camps of Displaced people | ||||
| (introduction...) | ||||
| A. Needs | ||||
| B. Water related health risks | ||||
| C. Water supply | ||||
| D. Assessment of water quality | ||||
| E. Simple water treatment technique | ||||
| F. Technical briefs | ||||
|
| |||||||||||||||||||||||||||||||||||||||||||||
The objective of this section is to suggest some concrete responses to water supply problems faced in camps of displaced people. However, most of the points considered, concern water problems in general, and apply to any deprived situation.
Like any population, displaced people need access to good quality water in sufficient quantity.
This need is that much greater in camps where the population concentration increases the risks of pollution and of epidemics of water-borne diseases.
Quantity
The notion of sufficient quantity is very subjective and depends strongly on the climate and on the habits of the population.
Nevertheless, it may be assumed that ten litres per person per day is a minimum need, while aiming to reach the following targets as soon as possible (UNHCR 1982):
- For domestic consumption: 15 - 20 litres per person per day
(drinking, cooking, hygiene).
- For collective feeding centres: 20 - 30
litres per person per day.
- For hospitals: 40 - 60 litres per person per
day.
In case of severe shortage, a daily ration of 4 to 5 litres may suffice very provisionally. Unless there is a shortage, it is better not to put any limit on consumption as the health status of the population is influenced by the quantity of water used.
It is not enough to supply 10 - 15 litres of water per person per day to a camp; people should actually be able to use this quantity. Therefore water should be reasonably accessible (in terms of distance and of waiting time at the water point), and the means to transport and store it should be available (if the supply is via taps, allow at least one tap per 200 - 250 people and arrange these taps in groups of 6 or 8 maximum). It is important to ensure that the population has enough containers (jerrycans, buckets, etc.) for the collection and storage of water; otherwise a distribution will be necessary.
If a sufficient quantity of water is not available near the site, moving the camp should be considered.
Quality
The water should be harmless to health and have an appearance and taste acceptable to the population.
Ideally the water supplied should meet the water quality standards of the WHO.
However, in practice it is often necessary to supply water which does not conform to these standards, simply because there is no alternative.
COMMENTS
- The quantity of water available has relatively more importance than its quality.
It is preferable to have a lot of water of average quality than little water of very good quality.
The lack of water to ensure a minimum of hygiene entails even more problems than does the consumption of relatively poor quality water.
- Water quality is important for drinking water but is of less importance for other uses (except where there is a risk of schistosomiasis). It is sometimes possible to supply water of two different qualities, but this generally entails more disadvantages than advantages.
Problems due to a lack of water
In extreme cases of lack of water, life is simply not possible (dehydration and death).
Less extreme shortages also have an impact on the health status of a population.
They provoke an increase in the incidence of numerous diseases due to a lack of hygiene. Good personal hygiene requires a sufficient quantity of water.
The diseases linked to a lack of water for personal hygiene, called "water-washed diseases", are:
DERMATOLOGICAL AND OPHTHALMIC DISEASES
Dermatological and ophthalmic diseases directly due to a lack of hygiene such as scabies, trachoma, conjunctivitis, etc.
DISEASES TRANSMITTED BY LICE
Lack of personal hygiene and washing of clothes encourages the proliferation of lice which, in addition to the problems caused by their presence (itching and scratching, skin sores), are disease vectors. They transmit louse-borne typhus and recurrent fever.
FAECO-ORALLY TRANSMITTED DISEASES
A lack of hygiene, particularly of hands and food, allows the transmission of these diseases from infected individuals (sick people or carriers) to uninfected individuals.
These so-called "dirty hands diseases" are: diarrhoeas and dysenteries (bacterial, protozoan, or viral), cholera, typhoid and paratyphoid fevers, hepatitis A, poliomyelitis and various helminth diseases.
Most of these diseases can spread epidemically in concentrated populations.
Problems due to poor chemical water quality
Water may contain numerous dissolved chemical substances which come either from pollution fertilizers insecticides, industrial waste, etc.), or from the composition of the rocks themselves (fluorine, arsenic, iron, etc.).
These substances may give the water such a bad taste that it is undrinkable (for example, if it contains too many salts or too much iron), but it may also, in the long term, cause severe health problems, for example:
- methaemoglobinaemia in babies, due to high nitrate levels,
- arsenic poisoning, etc.
The possible presence of toxic substances in water is something which must be borne in mind, but in the situations considered here, the microbiological quality of the water is a much more important and preoccupying problem.
Problems due to poor biological water quality
Water may contain numerous pathogenic organisms and thereby become a means of transmission for many diseases:
|
- Typhoid and paratyphoid fevers |
(bacteria) |
|
- Hepatitis A |
(virus) |
|
- Cholera |
(bacteria) |
|
- Poliomyelitis |
(virus) |
|
- Diarrhoeas (caused by Escherischia Coli, salmonellas and Yersinia Enterocolitica) |
(bacteria) |
|
- Viral gastroenteritis |
(virus) |
|
- Bacillary dysentery (caused by various species of shigellas) |
(bacteria) |
|
- Campylobacter dysentery |
(bacteria) |
|
- Amoebic dysentery |
(protozoa) |
|
- Giardia (lambliasis) |
(protozoa) |
|
- Balantidiasis |
(protozoa) |
|
- Helminthiasis caused by Ascaris and Trichuris |
(helminths) |
It should be noted that these so-called "water-borne" diseases form part of the group of "water-washed" diseases as well. They may also be transmitted by any of the faeco-oral routes: dirty hands, dirty food, dirty water, etc.
Besides these diseases, water is also involved in the transmission of "water-based" diseases (in other words, those diseases of which the causative agent passes part of its life-cycle in an aquatic plant or animal):
- The different schistosomiases or bilharzias: diseases caused by helminths (worms) which are usually contracted by contact with infested water (washing clothes, bathing, etc.), but sometimes also via the oral route.
- Dracunculiasis (Guinea worm), transmitted only by drinking infested water.
Lastly, water may also transmit:
- Leptospirosis: a bacterial disease which is contracted primarily by contact with water contaminated with the infected urine of various animals (principally the rat), but also by drinking such water.
All the infectious diseases transmitted by water -with the exception of Guinea worm- are linked to the pollution of water by the excreta of humans or other animals (from the sick or from healthy carriers).
Problems due to water-based insect vectors
One last category of water-related diseases is those with an insect vector which develops in or lives near to water, for example malaria, dengue and yellow fevers and onchocerciasis.
The solution to these problems lies among other things with the choice of site for a settlement and with environmental hygiene measures (drainage, elimination of stagnant water, covering reservoirs, etc.). They will not be considered in more detail here.
In terms of health
It is of primary importance that the population should be able to use a sufficient quantity of water to allow a minimum of hygiene, in addition to use for cooking. This means that the water should be available in sufficient quantity and easily accessible, and that people should have enough water containers.
In terms of water quality
The major danger is pollution of water by f�cal matter. Everything possible should be done to prevent such pollution. Nevertheless, it is preferable to have a lot of water of average quality than a little water of very good quality.

Figure
Different types of water
Potentially, three types of water may be available:
SURFACE WATERS: STREAMS, RIVERS, LAKES, PONDS, RESERVOIRS (DAMS)
- It is generally heavily polluted particularly during the rainy
season.
- Its quantity varies with the season.
- It generally needs
complex treatment before use. Nevertheless, certain catchment methods allow a
significant improvement of water quality: shallow wells dug close to river
banks, river bed filters, infiltration galleries.
GROUNDWATERS: WELLS, BOREHOLES, SPRINGS
- Deep groundwater (boreholes, deep wells, certain springs):
· Generally clear and of good bacteriological quality
(filtered by percolation
through rocks).
· Sometimes containing
substances rendering it undrinkable because of its taste or because of
toxicity.
· Not generally subject to much seasonal variation in quality
or quantity.
- Shallow groundwater (wells a few metres deep, certain springs, groundwater near water courses):
· The higher the water table, the lower the bacteriological
quality tends to be (water from less than 3 metres deep should be treated like
surface water).
· Subject to seasonal variation in quantity.
RAINWATER
- In non-industrialised regions, rainwater is relatively pure and may be consumed without treatment as long as it is collected with certain precautions, ie on a clean surface (tin roof, tent, plastic sheeting) and the first flow of water is rejected.
- Although rainwater rarely provides a regular supply, it may sometimes be a useful temporary or complementary supply (it may be a good alternative to heavily polluted surface water during the rainy season).
Warning !!!
- The exclusive consumption of rainwater without a complementary intake of essential minerals (such as iodine) causes problems in the long term.
- Rainwater dissolves the metal in which it is stored. Do not use containers or pipes made of copper, zinc or lead: clay, cement or plastic containers are suitable.
In practice there is rarely a choice between these different sources of water, particularly in emergency situations.
When settlement begins, surface water (the most polluted or the most easily polluted) is often the only supply available. It is therefore imperative to concentrate on the problem of water as top priority.
Sometimes, at first, supply by water tanker is the only solution. Other solutions should quickly be planned: drilling, digging wells, moving the camp, etc. (specialist advice will usually be needed).
Sometimes a piped supply from an urban area may be possible.
Priorities
What are the priorities in terms of water supply, when dealing with a concentrated population?
Before anything else:
- Find out where and how the people go to collect water and where they defecate.
Then:
- Designate defecation areas far away from water points.
-
Distribute water containers if necessary (very important).
- Take specific
steps to protect water points.
- Determine the amount of water
available.
- If necessary, set up a water rationing system.
Finally:
- If necessary, increase the output of the water points or look
for additional sources of supply.
- Create a reserve water stock.
-
Improve measures to protect water points.
- If possible, set up a system
whereby water is pumped into reservoirs before being distributed.
- Check
water quality if necessary.
- Possibly, install a treatment system.
WATER POINT PROTECTION MEASURES
All the protection measures aim at preventing the introduction of f�cal genes into the water (either directly, or indirectly by run-off or dirty soil falling into the water, etc.).
- Protection of water courses
Organize the use of the water course according to environmental health considerations. The point used for collecting water should be upstream of all other uses.
Note: surface water is always difficult to protect (there may be a village upstream). As soon as possible, use other sources (wells, springs, boreholes), or at least, pump the water so that people and animals do not have direct access to the water course.
- Well protection
Immediately (and this does not require any particular materials or skills):
· Employ a watchman to monitor access to the
well.
· Surround the well with a fence against animals. If it is used to
water animals, make a channel to take water to a trough situated outside the
protective fence.
· Forbid the use of personal water containers: one
rope with a single container should be provided for this use.
· Install
a winch or similar system so that the bucket and rope are not laid on the ground
and so that people do not lean over the well.
· Keep sources of
pollution such as latrines at least 30 metres away from the well and downhilI
from it if there is a slope (caution: in certain hard and fissured rocks, 30
metres is not enough).
As soon as possible:
· Make the improvements needed to prevent infiltration of
run-off (make the upper part watertight to at least 3 metres depth, install an
apron, a concrete slab on the head wall, and drainage of the surroundings,
etc.).
· Cover the well and install a handpump or a self-priming
motorpump (plan for maintenance and the supply of spare parts).
- Spring protection
Immediately:
· Install a system which prevents water from standing at
the spring (collect the running water with a split bamboo, for
instance).
· Erect a protective barrier around the spring (10 metres
above it).
· Dig a drainage channel 10 metres above the spring to avoid
it being polluted by run-off.
As soon as possible:
· Build a spring box.
Certain measures for the protection of water points can, and should, be taken during the very first days. Others require particular materials, equipment and skills, and should only be envisaged at a later stage, though as quickly as possible.
Do not wait to be able to solve the whole problem before starting work; every step taken is an improvement.
Note:
F�cal pollution of water may occur at any stage between its origin and its consumption. For example, for water from a well there may be:
- pollution of the water table,
- pollution of the water
inside the well (from soil, run-off, etc.)
- pollution during transport (from
dirty containers, dirty fingers, etc.),
- pollution during storage in the
home (from insects, dust, people taking water with dirty recipients, etc.).
Consumption of clean water can only be achieved by action at all levels, with a global programme of water point protection, excrete control and health education which is a long term programme).
Pollution at the source or during collective transport is nevertheless more dangerous than pollution in the home, because it affects the whole population at once and consequently encourages large scale epidemics.
CONTAINERS FOR TRANSPORT AND STORAGE
If the displaced people have not been able to bring enough containers with them they cannot use the water which is provided for them.
Each family should have containers with a total capacity of 40 litres as a minimum.
If the people do not have enough containers, it is vital to distribute them as a top priority.
Containers with small openings (like jerrycans) with a cap are the most suitable because they are used by pouring the water and not by dipping into it (which risks contaminating it each time).
Cooking oil is often distributed in such cans, and they can be re-used.
Traditional clay containers may be suitable as long as they are covered to prevent contamination by dust and insects.
Is the water potable or not?
The only criteria really of importance to health are the presence or the absence of pathogenic organisms and of toxic concentrations of certain chemicals.
Unfortunately these two criteria cannot be assessed by simple tests.
For example, there is no direct relation between the appearance of a sample of water and its potability. (A cloudy sample may be safe, whereas a clear sample may be both chemically and biologically dangerous.)
In non-industrialised areas the presence of pathogenic organisms is an infinitely more frequent problem than the presence of chemical substances at toxic concentrations.
ln practice, which analysis should be done and when?
TURBIDITY (CLOUDY APPEARANCE)
The presence of suspended solids is always a problem (the water is unpleasant to drink, there is a sediment, etc.), even if it does not necessarily mean that the water is polluted. But it is particularly important to take the turbidity into account if the water needs treatment.
The measurement of turbidity may be done with special equipment (graduated plastic tubes), but generally simply looking through the water in a transparent container gives enough information.
CHEMICAL ANALYSIS
In emergency situations a blind eye is usually turned to the acceptability of the taste and smell of water.
However, a laboratory chemical analysis may be requested:
- if a long term water supply is being planned,
- if there
are particular reasons to suspect chemical pollution.
BIOLOGICAL ANALYSIS
In other words, how to tell if water contains pathogens.
- Principle
The pathogenic organisms which may be present in water are too numerous and too various to be identified individually in practice (bacteria, protozoa, helminths, etc.).
As their presence is always linked to f�cal pollution (except for Guinea worm), it is preferable to look for organisms which are "indicators" of this pollution.
The indicator organisms generally looked for are the f�cal coliforms, principally Escherichia cold (E. Coli).
These germs are always present in large numbers in the faeces of man and other warm blooded animals.
The presence of f�cal coliforms an water indicates the possible presence of pathogenic organisms.
The absence of f�cal coliforms in water indicates the probable absence of pathogens, but is no proof of this (certain pathogens are more resistant than f�cal coliforms).
The count of f�cal coliforms (or E. Coli) per 100 ml gives an indication of the degree of f�cal pollution.
Note:
Other bacteria very similar to f�cal coliforms live more or less everywhere in the environment. They also belong to the coliform group.
|
Coliform group = |
- F�cal coliforms (principally E. Coli) |
|
(total coliforms) |
- Other coliforms |
In raw water (untreated), only the presence of f�cal coliforms is significant for health, because they are the only coliforms which prove f�cal contamination.
Although in certain cases total coliforms are identified, only f�cal coliforms are used as indicators in the field.
- Method of bacteriological analysis
The membrane filtration method is generally used. This consists of filtering the water through a membrane which retains bacteria.
The membrane is then incubated at 44ºC for 14 - 18 hours on a specific culture medium.
The count of those colonies which develop with a characteristic appearance gives the number of f�cal coliforms in the sample of water which was filtered.
Note
When incubating at 37 C all the coliforms develop, so the count is of total coliforms.
There are kits available for field analysis (for example the Del Agua/Oxfam kit or the Milliflex kit from Millipore), composed of portable filtration and incubation systems.
However, these kits are expensive and require good training in their operation and in the reading and interpretation of results.
- How to express the results of analyses?
· Number of coliforms/100 ml if it concerns total
coliforms.
· Number of f�cal coliforms/100 ml or sometimes number of E.
Coli/100 ml (the two may be interchanged, as in human faeces E. Coli represents
more than 90% of f�cal coliforms).
When to do a bacteriological analysis?
A bacteriological analysis is rarely necessary. It is generally much more important and useful to do a sanitary inspection (the origin of the water, protection of the water point, its siting in relation to defecation areas, protection of the water during storage and transport, etc.). Such an inspection will often make it possible to see that the water is polluted or has strong chances of being polluted at some time or other.
Analysis only gives an indication of pollution at the precise moment of sampling, and not of the potential risk of pollution.
Moreover, a sanitary inspection may be done by anyone, whereas bacteriological analysis needs equipment and proper training in its use and in the interpretation of results.
A bacteriological analysis should only be considered when:
· Deciding whether or not to treat surface water (see the
next section).
· Using properly protected groundwater which, despite
everything, is suspected of being the cause of a high incidence of diarrhoeal
disease, or of being the origin of an epidemic of diarrhoea, cholera or typhoid.
Caution: in no case is the detection of f�cal coliforms in water proof that the water is the origin of an epidemic. Detection of heavy pollution indicates that it may be the source of the epidemic, but is no proof of this. However, in this case, action must be taken anyway.
The analysis is done:
· Either by a competent local laboratory within 6 hours of
sampling (after this time the samples are no longer representative of the water
to be analysed).
· Or in the field by someone trained in the use of
field testing kits.
As long as the water is chlorinated and the free residual chlorine level is satisfactory (see brief Chlorination), bacteriological analysis is not necessary nor appropriate.
Storage and sedimentation
Storage is the simplest procedure to improve water quality (certain pathogens do not survive beyond several days), but it needs large reservoirs. Storage alone is not always a very effective procedure.
During storage there also occurs purification by sedimentation. Suspended material settles to the bottom of the reservoir with a proportion of the pathogens (mainly the largest: helminth eggs and protozoan cysts).
Sedimentation of turbid water is essential before filtration and disinfection.
If natural sedimentation is too slow, flocculation may be necessary (specialist help is needed for this). In practice, if water in a bottle is still muddy after an hour, then the natural sedimentation will not be enough.
Filtration
Passing water through a permeable bed eliminates a proportion of the pathogens by retaining them mechanically on the surface or within the filter.
Ceramic candle filters and certain sand filters (known as rapid sand filters) work on this principle.
SLOW SAND FILTRATION
Under certain conditions, in passing water through a bed of sand, particularly effective filtration is achieved by biological purification in addition to the mechanical action of the filter. For this to occur, the filtration must be relatively slow.
A deposit is formed at the surface and in the top few centimetres of sand, in which breeds a whole range of bacteria and microscopic plants, forming a skin (called the Schmutzdecke, biological membrane or bacterial film), which works both biologically and mechanically. It acts as a very fine filter which retains or kills most pathogenic organisms: it eliminates eggs, cysts, nearly all pathogenic bacteria and a proportion of viruses.
Slow sand filtration is the only procedure which achieves such an improvement of water quality in a single operation.
A slow sand filter can operate for weeks or even months without maintenance (which consists of the removing of a thin layer of sand when the filtration rate becomes too low).
In practice
At the collective scale, the construction of this type of filter needs the input of a specialist, and then the maintenance is relatively simple.
At a smaller scale, for example in a feeding centre, a small filter may be made with local materials.
Whatever the size of the filter, the operating principle remains the same.
Important
The bacterial layer is fragile and certain precautions should be taken to preserve it: never let it dry out, and never pass chlorinated water through it.
Disinfection with chlorine
Chlorine is a suitable disinfectant for water because it is very powerful without being toxic. It allows the destruction of all viral and bacterial pathogens in water.
Chlorine can also be used to disinfect surfaces in contact with water: the insides of wells, pumps, pipes, spring boxes, reservoirs, etc., (when putting into service, after repairs or after accidental pollution).
For this purpose it is used at much higher concentrations than for the disinfection of drinking water because the pollution may be much greater (see technical briefs Chlorine-generating products and Chlorination).
In the situations considered here, gas chlorination is not recommended because it can be dangerous and is not practical on a small scale. Chlorine-generating products are preferred: calcium hypochlorite, chloride of lime, sodium hypochlorite solution (see technical brief Chlorine-generating products).
All these chemicals release chlorine when they are dissolved in water.
Chlorine reacts immediately with all the oxidizable substances which may be present in the water (organic matter and certain mineral substances as well as pathogens and other organisms).
These substances consume chlorine. For the chlorination to be effective, sufficient chlorine must be added to meet this initial chlorine demand. This is confirmed by checking that an excess of unconsumed chlorine remains in the water (residual free chlorine: see technical brief Monitoring chlorination).
EFFECTIVENESS
At the doses normally used, chlorine destroys all pathogenic viruses and bacteria in water, but it is ineffective against:
- protozoan cysts and helminth eggs or larvae,
- pathogens
within suspended particles (as they are thus not in contact with the chlorine),
so it is advisable to filter water prior to chlorination, to remove eggs, cysts,
larvae and suspended particles.
PRACTICAL USE
Chlorination is a very suitable treatment method for emergency situations (e.g. typhoid or cholera epidemics), because it is very effective, but it is relatively tricky to set up and needs constant attention.
If water has to be treated, which method should be used?
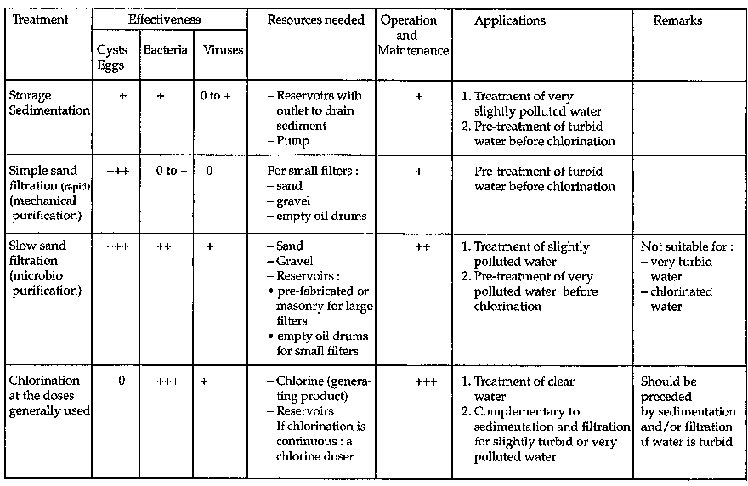
The choice of treatment method will depend on the appearance of the water, the supposed degree of pollution, or that measured by bacteriological analysis, and the technical options. See the following table.
In an emergency, chlorination is often the best technique, but in the long term, slow sand filtration is generally the most appropriate solution. However, it is always better to use water which does not need treatment.
Table
Digging a well
Protecting a well
Protecting a
spring
Washing area
Ferrocement tank
Fabricating concrete
rings
Choosing a motorpump
Ceramic candle filters
Slow sand
filter
Chlorine-generating products
Monitoring chlorination
Water
sampling
Water storage kit: 2,000 l
Water storage kit: 15,000
l
Distribution tapstand kit
Motorpump kit
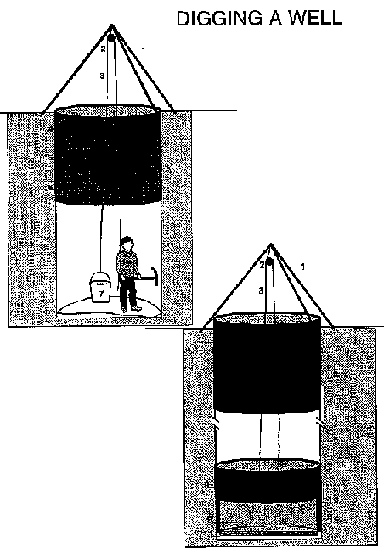
DIGGING A WELL
Method
The aim of this brief is not to look at all the types of wells there are, but to explain a technique which should be useful in the absence of other technical skills.
Numerous techniques exist for finding water. Good field observation, particularly of the vegetation at the end of the dry season, and above all, the advice of local well diggers will help to decide where and how to dig.
Construction
- Identify a suitable site (vegetation, etc).
- Mark out a
circle about 1.2m diameter.
- Dig to about 1m deep.
- Erect a tripod with
a pulley over the hole (the legs of the tripod must be firmly anchored).
-
Continue digging, taking out all the soil as the work proceeds, using a bucket
and the tripod.
- At regular intervals as the hole deepens, line the sides
with wire mesh and
plaster it with cement mortar.
- When the water table
is reached, lower porous or perforated concrete rings, using the tripod, and
continue to dig inside the rings: these will descend into the water as digging
proceeds. The water which accumulates in the rings should be taken out as the
work continues.
- Place a layer of gravel between the sides of the well and
the rings.
- The capacity of the well should be considered sufficient when
there is always water remaining at the bottom of the well after drawing water by
bucket over a period of 4 to 5 hours continuously.
- Place a layer of gravel
at the bottom of the well (see technical brief Protecting a well).
- Cement
the joint between the top edge of the highest ring and the cement-plastered
section of the well.
- Install a system to draw water from the well, and the
protection (see technical brief Protecting a well).
- Before use, the well
should be disinfected using chlorine solution (see technical brief Protecting a
well).
Key
1. Tripod
2. Pulley
3. Rope
4.
5.Sections of wire
mesh with cement coating
6.
7. Bucket
8. Bottom section of reinforced
cement lining (just above the water level)
9. First concrete ring
10.
Joint between reinforced cement lining and concrete rings
11. Gravel
Inputs
- 1 shovel, 1 pick, 1 miner's bar
- 3 beams (about 2 m long)
and 1 pulley
- 3 builder's buckets
- Mason's tools
- Rope (diem. over
10 mm), about 60 m
- Cement (about 1 bag per 3 m of well depth)
- Wire
mesh ("chicken mesh" type)
- Sand (0.15 m3 per 3 m of well depth)
-
Perforated or porous concrete rings: 3 or 4
- Material and tools for well
protection (see technical brief)
- Mechanical pumping system (if the flow of
water is too great to keep the well empty by bucket during the work).
Important
- Well digging should only be done at the end of the dry season
(except in an emergency), when the water table is at its lowest, to avoid the
nasty experience of finding the well dry after just a few months of use.
-
Hand-digging a well without supporting the sides should only be considered in
soils which are stable enough to be safe for the diggers.
- If other wells in
the area show the water table to be more than 30m deep, or if there are good
reasons to suspect the presence of a rocky formation between the surface and the
water level, then another technique (e.g. drilling) should be considered.
-
It is important to use local skills and knowledge when deciding where to site a
well and which technique to use. Skilled well diggers may often be found
locally.
- The technique described here (based broadly on the GRET technical
briefs) is one of the simplest. However, it is not suitable for all soil types
(e.g. sands).
- Take care when siting a well to avoid possible sources of
pollution (see technical brief Protecting a well).

PROTECTING A WELL
Method
A well should be protected as soon as it is dug. This protection consists of preventing anything from getting into the well, and preventing the infiltration of run-off and wastewater which could carry contaminating material. Lastly, protection strengthens the structure of the well.
What to do
1. Line the whole well with concrete rings (bought locally or fabricated - see technical brief Fabricating concrete rings); the lowest ring should be porous or perforated. The uppermost ring should extend above ground level. Pack gravel between the rings and the sides of the well.
2. Place a layer of gravel about 10 cm deep at the bottom of the well (in order to avoid the resuspension of settled particles).
3. Excavate the earth around the well head to a depth of about 30 cm, to a radius of about 2 m. Dispose of all the material removed and cast a concrete apron, surrounded by a drainage channel confined by a low wall about 5 cm high, at a radius of at least 1.5 m around the well head.
4. The slope of the apron (1%) should fall to a drainage channel leading to a soakaway pit, an irrigated garden or a cattle drinking trough (see corresponding briefs).
5. Install a pumping system (follow pump manufacturer's instructions).
6. Fix a cover (either removable or fitted with an inspection hole), on which to mount the pump body. (The pump makes work easier for users, but is also useful because it prevents potentially contaminated objects like buckets from falling into the well).
Key
I/ 1. Possible entry of pollution
2. The well
3. Water
surface
II/ 4. The well
5. Concrete rings
6. Concrete apron
7.
Drainage channel
8. Channel to soakaway pit
9. Soakaway pit
III/ 10.
Pump
11. Cover
12. Impermeable concrete rings
13. Anchoring collar on
concrete ring
14. Apron
15. Permeable concrete ring
16. Gravel layer
(about 10 cm)
Inputs
- Cement: about 4 bags of 50 kg
- Sand: about 400 kg
-
Gravel: about 800kg
- Reinforcing steel: about 20 m, or steel mesh, to
reinforce the apron (optional).
- Bricks or large stones for the base of the
apron: enough to fill underneath the apron.
- Concrete rings, inside diameter
about 1 m, height about 80 cm: allow 10 rings for 7 m of well depth.
- Porous
or perforated concrete rings: 1 or 2
- Cover which fits on the top ring
-
Handpump with fixtures and fittings
- Construction materials for the drainage
system (see technical brief Soakaway pit).
Important
- Respect safe minimum distances: no latrines closer than 30 m
from a well.
- Latrines should absolutely be downhill from the well.
-
Maintenance should be done carefully: the pump, the apron (repair possible
-
Before the first use, or after accidental pollution, disinfect the well with a
chlorine solution as described below. (For the preparation of 1% chlorine
solution, see technical brief Chlorine-generating products.)
- If it is
possible to empty the well: Empty the well, brush the sides above the water
level with a solution of 200 mg of chlorine per litre (20 ml of 1% solution/1),
leave for half an hour and let the well refill.
- If it is not possible to
empty the well:
1. Brush the walls above the water level with a solution of
200mg of chlorine per litre.
2. Determine the volume of water in the well
(vol = PI x r2 x h; PI = 3.14, r = radius of well, h = depth of water or height
of water column).
3. Add 10 litres of 1% chlorine solution (see technical
brief Chlorine-generating products) per m3 of water, mix and leave the well
dosed for 12 hours.
4. After this time, pump out the water until there
remains just a faint smell of chlorine.

PROTECTING A SPRING
Method
A spring should be captured and protected in such a way as to maximise the quantify and qualify of water supplied.
- If the spring serves few people, the spring box acts as a
storage reservoir before distribution.
- If the spring serves many people,
the spring box is connected to a larger reservoir
- If the spring box is used
for storage, its capacity should be at least equivalent to a 12 hours period
demand.
Construction
- Dig out and clean the area around the spring to uncover all
resurgences and so obtain the maximum yield.
- Calculate the quantities of
materials needed (concrete, stone, bricks etc), according to the size of the
spring box and the local means of construction.
- Construct the spring box
according to the plan. Its base should be on the impermeable layer (1).
-
Build the back wall (4) of stone without mortar, and fill the space between the
wall and the earth with gravel (3). Cover with a layer of compacted clay (10),
to prevent infiltration from the surface.
- Backfill the upper part with soil
and dig a drainage ditch about 10m above the spring box to divert run-off.
-
Erect a fence or hedge around the site at a radius of 10 m to keep out animals
which could damage or pollute the spring, and to limit erosion of the drainage
ditch.
- Fix an overflow pipe at the height of the top of the spring's
flow.
- Lay a surface of stone or concrete under the overflow and a drainage
channel to avoid erosion and mud around the spring box.
- Install the
delivery pipe connected to the distribution system about 10 cm above the bottom
of the spring box.
Key
1. Impermeable layer
2. Emergence of spring
3. Gravel
backfill
4. Stone wall with open joints
5. Drainage channel
6.
Desludging pipe
7. Delivery pipe to distribution system
8. Overflow
9.
Cover with lock
10. Layer of clay
11. Soil
12. Protective fence or
hedge
13. Run-off drainage ditch
Inputs
- Detailed plan of spring box
- 2 masons, 2 labourers
-
Mason's tools
- Construction materials, according to local availability,
quantities calculated from the size of the spring box
- Concrete (1: 2: 3
cement: sand: gravel)
- Calculate the volume of concrete needed and multiply
by 15 to obtain the volume of dry mix (The volume of a 50kg bag of cement is
0.033 m3)
Important
- The aim of protecting a spring is to increase its useful yield
and reliability, and to protect it from surface pollution
- It is important
at the outset to carry out a sanitary inspection so as to identify the risks of
pollution and to do yield tests to be sure that the supply can meet users'
needs.
- Never try to make the water rise above the highest point of
resurgence as this could produce a backpressure which would make the flow emerge
elsewhere. The water should be captured on the impermeable layer.
- Be
careful not to divert the spring in another direction or into another fissure
when digging around it. Terracing should start at the point where the water
comes out of the earth. Continue to dig working back up the water-bearing layer,
while ensuring that the water flows away.
- A good spring should have a
constant temperature. If this is not the case, check above the spring to see if
the water comes from a surface water source which runs underground. The yield of
a spring with such a surface source will rise immediately if it rains.
- It
may be considered that for a reliable spring:
the yield in the rainy
season
—————————————
= 3 to 5 maximum
the yield in the dry season
- The distribution and overflow pipes should be fitted with a screen (e.g. metal mosquito netting) in order to avoid the passage of insects and/or large particles.

WASHING AREA
Method
As its name suggests, a washing area should provide a hygiene
facility for a population in an emergency situation, without creating
environmental health risks
(stagnant water etc).
It is built close to a water point and its design should be adapted to the habits of the population (particularly concerning the position generally used by women to wash clothes).
The washing area described here is about the simplest it is possible to be build. It can be made of local bricks and mortar or of stone masonry.
Construction
- Choose a space down the slope from the apron of the water point. Lay out the area using a string line. Its size will depend on the number of people likely to use it at one time.
- Excavate about 30 cm of soil from this area to create a slope of at least 1% along its length, with a "V" profile across its width (see section AA); spread a 5 cm layer of sand and gravel on the bottom and compact it well.
- Dig a channel to take water from the water point to the washing area. This channel should have a slope of at least 1% and should join the highest end of the washing area.
- Lay bricks on the washing area, using a string line and a spirit level, cementing the joints (be careful to keep to the same slope and the same cross-section).
- When the cement has set, plaster the surface with a strong cement mortar (1 part cement to 2 parts sand), and smooth it well.
- Powder the surface of the plaster with cement when it is still wet and smooth it again to waterproof the surface.
- Cover the slab with plastic sheeting or thick sacking which is regularly wetted, and let it cure for 5 to 6 days before using.
- Dispose of wastewater in a soakaway pit, an evapotranspiration area or an irrigated garden (see relevent technical briefs).
- Fence off the area to protect it from animals.
Key
1. Well head
2. Drainage channel
3. Washing slab (sloping
towards drainage channel to disposal)
4. Drainage channel
5. Drainage
towards disposal
6. Stones
Inputs
- Shovel and pick
- String line and tape measure
- Spirit
level
- Sand and gravel
- Cement (about 50 kg)
- Bricks or stones
-
Trowel, float, cement-mixing trough
- Plastic sheeting, jute sacking, leaves,
etc.
Important
In all cases the dimensions of the washing area should be adapted to the habits and the average height of its users. The model illustrated here is suitable for people used to washing clothes in a crouching position. If people prefer to wash clothes standing up, a raised washing slab (table height), or an emptyable, raised concrete washtub is better.
During the early days of a camp, it is possible to make washing areas using only plastic sheeting (of the sort used for temporary shelters). The ground surface must be carefully prepared, removing all sharp objects (stones, roots, etc).
Drainage channels may be dug and lined with a double thickness of plastic sheeting, following the above guidelines for the slope. The edges of the plastic should be anchored to the ground with stones covered with well compacted earth.
This technique only lasts a few days because:
1) the plastic sheeting gets damaged very quickly,
2) and it
will probably be stolen.
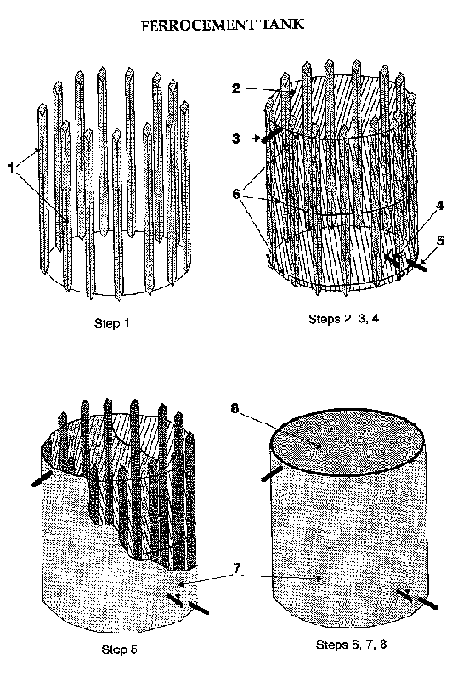
FERROCEMENT TANK
Method
The construction of a ferrocement water tank may be considered when planning to collect rainwater etc. Its watertightness and strength are directly related to the quality of materials used and the care taken in its construction.
A shape in ferrocement is created using a removable mould to which wire mesh is attached and to which a cement coating is applied.
It is equally possible to build a framework of reinforcing steel which avoids having to use a mould. The steel is thus embedded in the cement coating and reinforces the structure.
Technique using wooden stakes (for a tank of 1,500 l)
1. Drive stakes into the ground, leaving at least 1.5 m above ground level with centres spaced at 20 cm, to form a circle 1.2 m in diameter.
2. Wind three thicknessess of wire mesh around the circle of stakes. Stretch and flatten the layers of mesh well against each other and fix them to the stakes and to each other with fine wire.
3. Reinforce the structure by winding round it three turns of thick wire at the top, in the middle and at the bottom.
4. Push a length of pipe with a valve attached through the mesh near the bottom (for emptying), and another one several centimetres higher with a tap for the outlet. A third pipe for the overflow is fixed near the top of the tank.
5. Apply a 15 mm first coat of cement plaster to the outside. One person should be on the inside to retain the mortar with a float as it is applied. Leave it to harden for 12 to 24 hours, keeping it damp.
6. Pull out the stakes and cut off the wires which stick out.
7. Apply a coat of cement plaster to the inside so as to cover the mesh completely. Leave it to harden for 12 to 24 hours.
8. Apply finishing coat to the inside and the outside and smooth well.
9. Cover the bottom of the tank with wire mesh and curve it up at the corners where the walls meet the bottom. Plaster the base, forming a slope towards the emptying pipe.
Key
1. Wooden stakes
2. Wire mesh
3. Overflow pipe
4.
Tap
5. Emptying pipe
6. Galvanised steel wire, 2 - 2.5 mm dia.
7.
Exterior coat of cement mortar
8. Interior coat of cement mortar
Inputs
- 20 sharpened wooden stakes (50 x 50 x 1,750 mm)
- 25 m of
fine wire mesh (12 mm mesh, 1.5 mm wire)
- 2 - 3 bags of cement
- 500 kg
of building sand
- 3 x 30cm lengths of metal pipe, one fitted with a tap and
one with a valve
- 1 roll of fine wire (0.5 mm)
- 1 roll of thick wire (2
mm)
- Mason's tools
- 2 people for 3 days
- 1 sledgehammer
Important
- Preparation of cement mortar: 1 part cement to 2 or 3 parts
dean, sieved sand.
- Final thickness of tank walls: 30 to 40 mm.
- A metal
cross piece is welded on the pipes to anchor them in the mesh before
plastering.
- To make a cover on the tank it is possible to extend the mesh
with its shuttering or reinforcing steel framework. An inspection hole with a
cover should then be made at the top of the tank
- Otherwise, the tank should
be fitted with a cover to protect the stored water.
- Once the coats have
been applied it is important to cover the tank with damp jute sacking or plastic
sheeting for at least one week for good curing of the cement. This allows the
cement to develop its full strength and avoids the risk of cracks appearing.

FABRICATING CONCRETE RINGS
Method
Concrete rings are needed to line and protect hand-dug wells. They may have other uses, such as making a spring box, a rainwater collection tank etc.
Concrete rings for infiltration at the bottom of a well may be perforated during fabrication, or made of porous concrete. Porous concrete rings are preferred for use in decomposed rock, sand or gravel.
Concrete rings used for the main part of a well or for water storage should obviously not be porous or perforated.
- The internal diameter of the rings should be at least 0.8 m so
that a person can work inside the ring if necessary.
- The mould is of steel
plate, at least 3 mm thick, reinforced with angle steel. It is composed of two
parts: the internal and external rings. Each of these parts is made of three
sections which bolt together.
- The mould is generally 1m high (less if
necessary).
- The bottoms and tops of the rings are stepped so that they fit
together well. The groove may be formed using a template or a plastic tubing
against the internal face at the bottom of the mould, and against the external
face at the top when the mould is almost full of concrete.
- The mould
sections are removed about 24 hours after casting. The rings should be cured in
the shade for at least 1 week, during which they should be kept damp (wetted
jute sacking or plastic sheeting).
- For perforated rings, the moulds are
made with holes every 15 cm. Greased pegs are inserted when the concrete is
cast; they are withdrawn before the concrete sets completely.
- After each
use the mould sections should be scraped and brushed and the contact surfaces
coated with used engine oil or diesel to prevent concrete sticking to them.
Key
1. External mould, diameter 1.15 m
2. Internal mould,
diameter 1 m
3. Concrete ring
4. Bolts
5. Wooden or metal pegs (for
perforated rings)
6. Reinforcing angle steel
Inputs
- 2 workers
- Cement, sand and gravel (about 0.25 m3 of
concrete per ring)
- 1 ring mould
- 2 shovels, 2 buckets, 2 trowels
- 1
wire brush
- Used engine oil
- 1 spanner, 1 lump hammer
- Plastic
sheeting or jute sacking
Important
- Concrete mix for ordinary or perforated ring is 1: 2: 4
cement: sand: gravel. Compact the concrete well during casting to drive out air
bubbles.
- Concrete mix for porous rings is 1:1: 4 cement: sand: gravel. The
concrete should not be too wet. Instead of compacting, vibrate it by hitting the
mould with a wooden stick. Porous rings should cure for longer than ordinary
ones. They are more fragile and should be handled with care.
- When the rings
are produced in series for a programme of well protection, it is recommended to
use a sheltered area for curing and storing the rings.
- A tripod and pulley
should be used to lower the rings safely into the well.

CHOOSING A MOTORPUMP
Method
A motorpump is composed of a pumping mechanism and a driving mechanism (electric motor or combustion engine).
The choice of a motorpump depends on the type of water source and the work to be done.
The water source:
A study of the type of water source (river, lake, well, deep or shallow borehole) and its situation allows the choice of a surface pump or a submersible pump.
For a suction height of up to 7 metres, any type of surface pump may be used.(The pump body is at the surface: it sucks and delivers.)
For greater lifting heights (deep wells and boreholes), a submersible pump is suitable (an electric pump, completely immersed: delivery only).
The work to be done:
The following information is needed when specifying a pump for a specific use:
- The discharge, Q. expressed in litres per second or cubic metres per hour, or the demand in cubic metres per day.
- The vertical distance in metres between the lowest water level and the highest level to which water must be pumped (suction height and delivery height), or the total geometric head.
- The variation of the water level in metres.
- Physical information on the site: depth of water, diameter and depth of well or borehole, sketch with dimensions of river bank, lake or channel.
- The height of the site above sea level.
- The energy source for pumping: human, animal, wind, electric motor, combustion engine, solar, etc.
- The average weight which can be easily transported and handled on site.
Key
1. Suction head
2. Delivery head
3. Level of pump
axis
4. Lowest water level
5. Highest water level
6. Internal diameter
of suction pipe
7. Internal diameter of delivery pipe
8. Length of suction
pipe
9. Length of delivery pipe
10. Atmospheric pressure
11. Motorpump
unit
12. Non-retum valve
13. Suction strainer with foot valve
14.
Storage reservoir
Inputs
- Measuring equipment (rope, tape measure, level, etc)
-
Sketch and description of site
Important
The following factors must also be considered:
- The possible presence of large quantities of sand in the water
which may damage the moving parts of the pump.
- The presence of salty or
brackish water which could produce rapid pump corrosion.
- The ease of
maintenance and robustness of the pump, the availability of fuel (what type of
fuel) or electricity, the availability of tools, spare parts and maintenance
skills.
- The pumping schedule: a few hours per day, or 24 hours per
day?
- Calculation and comparison of the costs of different options.
Note:
The suction ability of a surface pump is limited to 7m head at sea level, whatever its power. It diminishes as the altitude increases (see table opposite).
On the other hand, its discharge capacity is directly related to its power.
The discharge of a pump can be regulated by means of a valve at the discharge outlet.

CERAMIC CANDLE FILTERS
Method
Ceramic candle filters can remove practically an bacteria, some viruses and all suspended material from water.
Important: this technique is not effective for dissolved substances (salts, chemical pollutants, etc.).
Water is passed through microporous ceramic walls with a pore diameter of about0.45�.
Siphon filter
- Place the water to be filtered in a container, immerse the candle, place another container underneath and let the filtered water siphon through, drop by drop (the siphon is primed automatically).
Gravity filter
- The same principle as above, but one container stacks on top of the other.
This method produces a greater flow than the siphon as it uses several candles (provided they are not clogged).
Pump filter (also called "Katadyn")
Here, the water is forced through the filter under pressure using a small integral handpump, thus improving the flow.
- Put the end of the plastic pipe into the water to be filtered,
and pump.
- Inside the candle there is activated carbon which adsorbs
dissolved substances and takes away any possible taste from the water.
Tap filter
- In this unit the candle is mounted inside a cylinder. (It is
like the siphon filter candle, but filled with activated carbon.) A plastic hose
is connected to the tap.
- When the tap is turned on, water fills the
transparent filter body, passes through the candle and comes out of the
spout.
- Important: this filter can only be used where there is enough
pressure in the piped water supply.
Key
1. Water to be filtered
2. Ceramic candles
3. Siphon
tube
4. Collecting filtered water
5. Container of water to be
filtered
6. Ceramic candle fastening and rubber washer
7. Tap
8.
Cover
9. Transparent filter body
10. Outlet for filtered water
11.
Handpump
12. Fastening collars
13. Flexible tube (raw water)
14.
Strainer (to prefilter raw water)
15. Universal tap fitting
Inputs
Siphon filter
- Ceramic candle with flexible siphon tube
Gravity filter
- 2 containers (metal or plastic)
- Ceramic candles (2 or 4)
with rubber washers and wing nuts
- Tap
Katadyn
· Kit containing:
- 1 pump filter with flexible tube attached
- 1 brush to
clean ceramic candle
- 1 gauge to measure thickness of candle
Tap filter
- Filter body with flexible hose and universal rubber tap
adaptor
- Ceramic candle (delivered together)
Important
- Siphon filter: ensure that the flexible tube is firmly attached to the ceramic candle so that no water is siphoned directly without filtration.
- Gravity filter: assemble the candles correctly with their rubber washers to ensure that no water passes without filtration.
- Katadyn filter: change the candle as soon as the measuring gauge passes freely around it (see maker's instructions).
- Teams in the field should always drink filtered water because they can never be sure of the quality of local water supplies.
- Never let the candles come into contact with boiling water as there is a risk of cracks forming.
- Maintenance of ceramic candles: when the flow becomes too weak, brush the candles (e.g. with a toothbrush) under clean running water, rinse and reassemble. The candles are fragile, handle them with care.
- The tap filter is ideal for washing hands etc. in an operating theatre, if the hospital has running water. Be careful not to loose the little rubber rings on the tap adaptor.

SLOW SAND FILTER
Method
Slow sand filtration a highly effective microbiological purification of water in addition to mechanical purificationby the sand.
This microbiological treatment is due to the action of a biological layer (called the Schmutzdecke), which develops at thesurface of the filter. This layer actively retains and destroys helminth eggs, bacteria and some viruses.
Construction
1. Paint the insides of two 200 l drums. Fix an inlet pipe about 5 cm from the bottom of one drum which which be used for the prefilter (as shown in the sketch).
2. Place a layer of large stones on the bottom of this drum (4), making sure there is a plug-hole at the bottom. If there is not, then make one.
3. Place a perforated plate (e.g. the top cut off the drum) on top of the stones (2), to act as a support for a layer of coarse sand.
4. Place a 30 cm layer of coarse washed sand (1 - 2 mm dia) on top of the metal plate.
5. Fix a pipe connecting the two drums near the top, to take water from the prefilter to the filter.
6. Make sure the second drum has a plug-hole in the bottom. Make a hole about 5 cm from the bottom and insert a perforated pipe (9). A length of PVC pipe with many slots cut with a saw is suitable.
7. Bury the perforated pipe in a bed of gravel (8), which covers it by at least 5 cm.
8.Then add a layer of at least 70 cm of washed, sieved, fine sand (7). The ideal diameter is 0.2 to 0.5 mm, or in any case, less than 1.5 mm. The Schmutzdecke will develop at the surface of this sand.
9. Place a flat stone (10) where the water flows onto the filter so it will not to disturb the Schmutzdecke by its turbulence.
10. Insert and fix the pipework (outlet and overflow). Important: the outlet pipe must rise above the level of the top of the sand, so that the filter surface is always under water, even if the water supply is cut.
Key
1. Raw water inlet valve
2. Perforated plate (holes about 2
mm die every 5cm)
3. Coarse sand (1-2 mm dia)
4. Large stone (e.g.
cobbles)
5. Plug-holes with plugs
6. Prefilter overflow (towards
filter)
7. Fine sand (0.2-0.5 mm dia)
8. Gravel
9. Perforated pipe (for
collecting filtered water)
10. Flat stone
11. Outlet valve
12. Outlet
pipe to distribution
13. Overflow
A. Minimum water level in filter
B. Maximum water level in
filter
Inputs
- Two 200 l drums
- Metal saw, hammer, cold chisel, tape
measure
- Drill and bits
- Round and half-round files
- Pipe (PVC or
galvanised), 1/2" or 3/4"
- Pipe threader (for galvanised pipe) or solvent
and PVC glue
- Teflon tape or mastic and tow (for making joints)
- Elbows
and nipples (for fixing pipes)
- Anticorrosion and household paints
-
Paintbrush and thinners
- Cobbles (stones)
- Coarse sand (about 1 mm dia):
about 0.12 m3
- Fine sand (0.2 - 0.5mm dia): about 0.3 m3
- Gravel: about
0.03 m3 important
- The filter sand should be of uniform size. Sieve it, using mosquito netting for instance.
- Before the first use, fill the prefilter and the filter with a solution of 100 mg/l chlorine (10 ml of 1% solution per litre); leave it for 12 hours and empty it through the plug-holes. Never chlorinate after this: it would destroy the biological layer. Cover the drums to prevent the growth of algae.
- It is vital that the Schmutzdecke at the surface of the sand
is always covered with water; again, make sure that the outlet pipe rises above
the level of the
Schmutzdecke.
- Flow setting: close the outlet valve. Open the inlet valve (not too much, to avoid putting the prefilter sand into suspension); when the filter is full, open the outlet valve so as to have an outflow of about 1 l/min.
- The Schmutzdecke is only effective after about 2 weeks, so for the first 2 weeks of service the water is not safe.
- Such a filter can treat 1,000 to 1,400 l/24 h. If the needs are greater, several filters may be built in parallel (this also avoids having to cut the supply during maintenance).
- Maintenance: when the yield drops significantly, cut the inflow and undo the plugs of the two drums. Let the water empty completely from the prefilter. Let the water level in the filter fall to 15 - 20cm below the filter surface; rake the top 1 - 2 cm of sand from the Schmutzdecke. Replace the plugs and put back into service. After this has been done several times, remove about 10 cm of sand and put it to one side. Place a layer of clean sand and then replace the 10 cm, to bring the total thickness of fine sand back to 70 cm.
- If the water is not very turbid (<30 NTU), the prefilter will not be necessary.
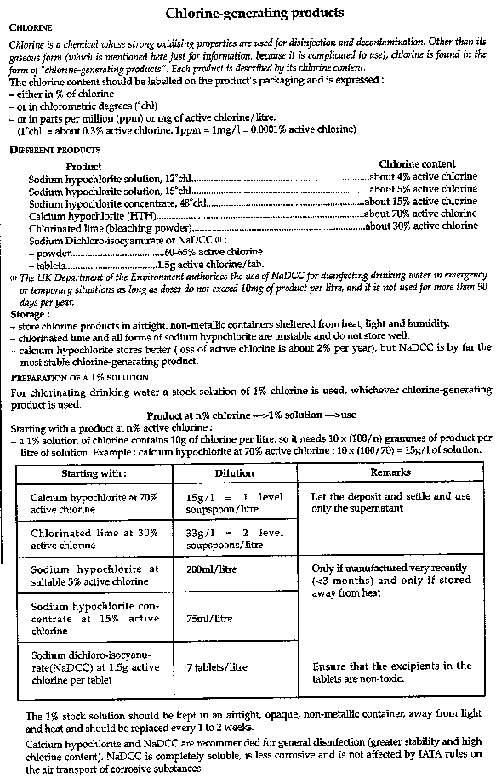
Chlorine-generating products
CHLORINATION
Method
Chlorination is one of the best methods of treating drinking water (relatively simple, effective and easy to measure). In spite of this relative simplicity, it should not be forgotten that in an emergency situation it is always preferable to use a groundwater source which can be protected and monitored in terms of environmental hygiene (see technical brief Protecting a well).
Chlorination demands staff trained in the technique and in its monitoring as well as good logistics (supply of chlorine product storage, etc.).
In practice
Only the chlorination of a known volume of water in a reservoir is discussed here.
- The principle is to add enough chlorine^generating product to destroy all the organic matter contained in the water and to leave a small fraction of chlorine available for dealing with any possible reintroduction of organic matter. To determine how much chlorine product to add, the chlorine demand is measured.
1. Prepare a 1% chlorine solution (see technical brief Chlorine-generating products).
2. Take 3 or 4 non-metallic containers of known volume (e.g. 20 l buckets).
3. Fill the containers with some of the water to be treated.
4. Add to each bucket a progressively greater dose of 1% solution with a syringe:
1st container: 1 ml
2nd container:1.5 ml
3rd container: 2
ml
4th container: 2.5 ml
5. Wait 30 minutes (essential: this is the minimum contact time for the chlorine to react).
6. Measure the free chlorine residual in each bucket (see technical brief Monitoring chlorination).
7. Choose the sample which shows a free residual chlorine level between 0.2 and 0.5mg/l.
8. Extrapolate the 1% dose to the volume of water to be treated.
9. Pour the solution into the reservoir, mix well (during filling) and wait 30 minutes before distributing.
Example
Chlorination of water in a 2,000 l reservoir
- Follow steps 1 - 5 above.
- The free residual chlorine
levels of the water in the buckets, measured half an hour after adding 1, 1.5, 2
and 2.5 ml of 1% chlorine solution respectively are as follows:
1:0 mg/l
2:0.1 mg/l
3:0.4 mg/l
4:1 mg/l
- The dosing rate chosen therefore will be that for bucket number 3 (result between 0.2 and 0.5 mg/l
- If it needs 2 ml of 1% solution to chlorinate 20 l of water at the correct dosage, then it needs 100 times as much to chlorinate 2,0001, e.g.: 100 x 2 ml = 200 ml of 1% chlorine solution
Inputs
- 1% solution
- Several containers of the same known volume
(buckets, jerrycans, etc.).
- 5 ml syringe
- Measuring equipment
(comparator and DPD1 tablets)
- Watch to measure the 30 minutes
The MSF "chlorination" kit, available through MSF logistics, contains all the material needed for chlorination and dosing.
Important
- Never chlorinate turbid water because the suspended particles can protect micro-organisms. The measurement of free residual chlorine may indicate a satisfactory result (between 0,2 and 0,5 mg/l), but there is no way of knowing if the chlorine actuary comes into contact with all the pathogens. Water to be chlorinated must contain as little visible suspended material as possible. If it is turbid, a pretreatment such as sedimentation and/or filtration should be done before chlorination.
- Chlorination is effective against practically all pathogenic micro-organisms in water. The only way to be sure of this effectiveness is to dose the free residual chlorine. Important: even if the dosage rate is correctly determined, the chlorine demand may vary over time with unexpected changes in the amount of organic material in the water. It is thus important to measure the free residual chlorine frequency in order to be able to adjust the dosage rate to the situation.
- Metal consumes chlorine, so never prepare strong solutions in metal containers (unless they are enamelled or painted).
- Concentrated chlorine products should be kept in a dry, shaded place, and guarded. (Chlorine is dangerous, particularly for children). When in contact with air, chlorine produces a corrosive and toxic gas heavier than air. The ventilation of chlorine stores should therefore be by means of vents at the bottom of the walls.
- The doses of 1% chlorine solution given here for the example of calculating chlorine demand are only an indication. It may be that the chlorine demand of water to be treated in the field is very different from this example.
- The taste of chlorine in water is no proof of the presence of free residual chlorine (it could be combined residual chlorine).
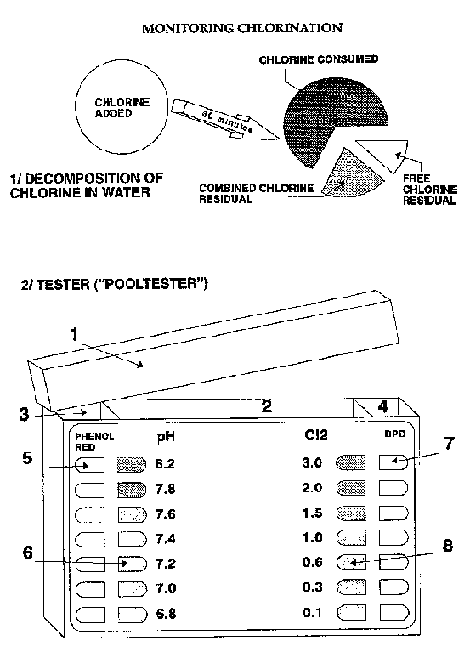
Monitoring chlorination
Method
The simplest and surest way of motoring effectiveness of chlorination of drinking water is to measure Free Residual Chlorine (FRC).
The presence of FRC in water (after a contact time of 30 mins) proves that enough chlorine has been added to oxidise all organic matter in the water, plus leaving an excess of chlorine available to deal with possible recontamination (in the distribution system, during handling etc.).
The objective of chlorination (see technical brief Chlorination) is thus to add enough chlorine to leave between 0.2 and 0.5 mg/l of FRC after the contact time.
The measurement is most easily done using a "Pooltester"
1.Rinse the Pooltester 3 times with the water to be
tested.
2.Fill the 3 compartments completely with water.
3.Put 1 phenol
red tablet in the left hand compartment (measurement of pH).
4.Put 1 DPD1
tablet in the right hand compartment (measurement of Free Residual
Chlorine).
5.Replace the cover.
6.Shake until the tablets are completely
dissolved (about 20 sees).
7.Read the results in the light, comparing the
colours in the outside compartments (samples) with those in the central
compartment (reference).
Key
1. Cover
2. Central compartment
3. pH compartment (phenol
red tablet)
4. FRC compartment (DPD1 tablet)
5. pH reading scale
6. pH
reference scale
7. FRC reading scale
8. FRC reference scale
Inputs
(for 1 measurement)
-1 pooltester with cover
-1 phenol red tablet
-1 DPD1
tablet ("DPD1" is marked in green on the packet)
- Water to be tested
Important
- Never touch the tablets with the fingers: this could affect
the results.
- The printing "DPD1" must be in GREEN on the packaging. There
are other DPD1 tablets with the printing in black. They should not be used in
this pooltester.
- Read the results within 60 seconds of the tablets
dissolving to be sure of a reliable measurement.
- Read the results in good
light (daylight is best).
- The pH need not be measured every time. It is
used for determining the amount of chlorine product to add to the water.
-
Comments on the pH of water:
pH = 7: neutral
pH < 7: acidic
pH > 7: alkaline (or
= basic)
· Important: chlorination is less effective if the pH is above 8. In this case, the FRC level after the contact time should be double the normal (between 0.4 and 1.0 mg/l instead of 0.2 - 0.5 mg/l) for chlorination to be considered effective.
· Important: if chlorine is overdosed, the measurement of FRC may give a false negative result.
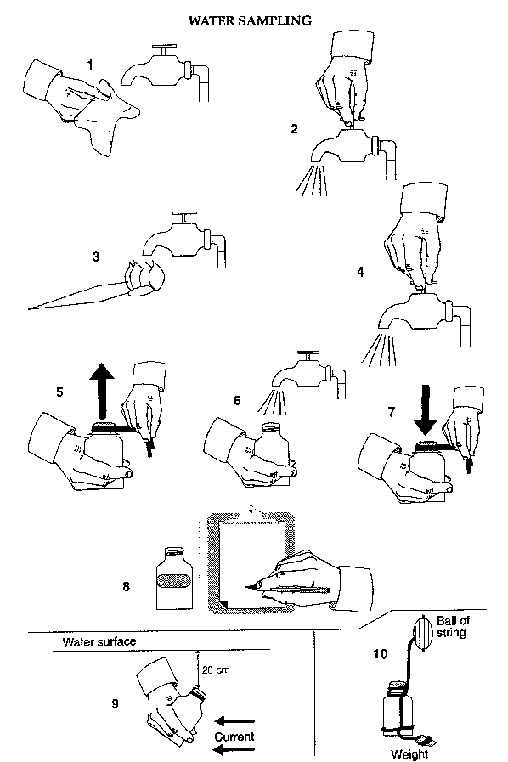
WATER SAMPLING
Method
Important: the sampling technique differs according to whether it is for bacteriological or chemical analysis.
The results are in the section "Assessment of water quality".
Chemical analysis
- Collect at least 2 x 11 in plastic bottles (e.g. mineral water bottles), which must be clean and airtight.
- Rinse the bottles 3 times with the water to be analysed, fill them right to the top, label them and send them to the analytical laboratory.
Bacteriological analysis
- Collect at least 100ml in a sterile bottle.
- To sterilize
bottles, place the cap loosely on each one so that steam can circulate
inside.
- Wrap each bottle in tissue paper, newspaper or wrapping paper.
-
Sterilize in an autoclave for 15 minutes at 121°C (a small autoclave like
the "Prestoclav" is quite suitable).
- If there is no autoclave, the bottles
may be sterilized by boiling: place each bottle and cap in the water and let it
boil for 20 minutes.
- After 20 mins boiling, take out of the water, and let
it cool protecting the opening with flamed aluminium foil or a sterilized
compress.
- Use as soon as possible.
- For the bacteriological analysis of
water that has been chlorinated, add 0.15ml of 1% sodium thiosulphate solution
per 100ml of sample to each bottle before sterilizing, in order to neutralize
the chlorine which would otherwise affect the results.
Key
(1 - 8: water sampling from a tap for bacteriological analysis)
1. Clean the tap (alcohol or soap)
2. Let the tap run fully
for about 30 seconds
3. Flame it with a pad soaked in alcohol
4. Let it
run fully again for 30 seconds
5. Take off the cap and its protection from
the bottle
6. Take the sample
7. Replace the cap
8. Label the sample
and record it in a notebook
9. Sampling from a water course
10. Sampling
from a well
Inputs
Chemical
- Glass or plastic bottles, 1 or 1.51: 2 per sample
- Marker
pen for labelling
- Thermometer
Bacteriological
- 2 sterile 100 ml bottles
- String and weighting stone (for
sampling from a well or other inaccessible place.
- Cloth
- Alcohol and
tighter
- Cotton wool and forceps (e.g. hair tweezers)
- Thermometer
-
Cool box
Important
- The 8 steps described here for sampling from a tap are not necessary for chemical analysis, but are absolutely necessary for bacteriological analysis. They are the only way to be sure that the results of the analysis reflect the quality of the water and are not affected by possible contamination on the tap, during handling.
- Always work with clean hands (washed with soap). Any contamination by dirty hands will distort the results.
- Never touch the inside of the sterilized bottle or its cap. When sampling, hold the cap by the outside; never put it down unless it is upside down. It is better, for security and reliability, to double each sample.
- Mark the following on each sample (and keep a copy):
- an identification number, the place and the type of water
sampled, as accurately as possible;
- the date and time of sampling and
dispatch;
- the substance(s) or organism(s) to be identified; techniques
-
treatment, if any, of the water (product and dose);
- water temperature at
the time of sampling (if possible).
- Certain chemical tests require special sampling. Enquire about
these.
- For bacteriological analysis, it is often simpler to use field
testing kits (e.g. De lAgua or Millipore); in fact, samples should reach the
analytical laboratory within an hour of sampling if they are kept at ambient
temperature, or within 6 hours if they are kept at between 4 and 6°C (but
not frozen).
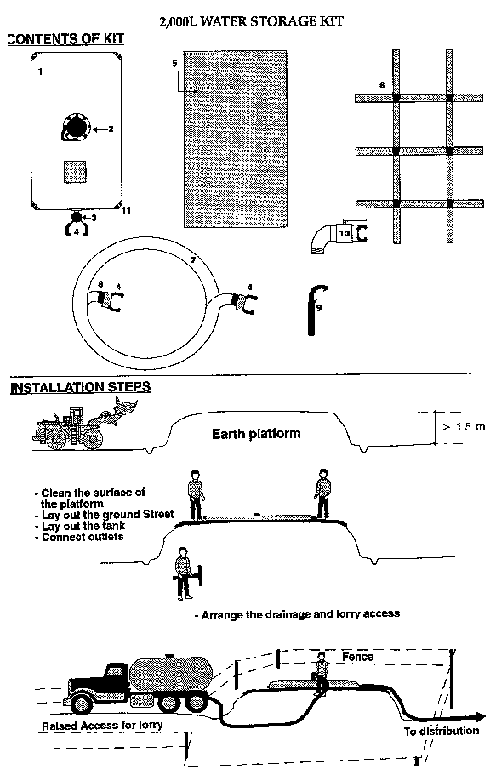
2,000 litres water storage kit
Method
This kit is for the supply of water to a health structure (dispensary, small hospital, feeding centre, etc.).
Once the base has been prepared (a raised earth platform), the bladder tank can be in operation in a few minutes.
Installation
- Choose the site for installing the tank, close to the centre to be served.
Important: make sure that the site is accessible at all times for filling the tank (e.g. by lorry tanker).
- Prepare a flat platform, about 15 m high so that the water may be distributed by gravity. The higher the platform the better the distribution.
- The surface of the platform should be cleared of all objects (stones, sticks, etc.) which could puncture the tank. If possible, cover the surface with a layer of sand.
Important: the area of the platform should be larger than that of the tank (3 m x 1.7 m). Note also that this platform should be strong enough to support 390 kg/m3.
The platform may be made of compacted earth, or oil drums filled with stones or earth with earth packed between them, or a flat roof may be used, etc.
- Spread the groundsheet on the platform.
- Lay the tank out
on the groundsheet.
- Tighten the outlet valve; it is not completely screwed
on by the manufacturer.
- Attach the pipe to the outlet.
- Organise the
distribution system in the health centre (or right next to it), using either the
1/4 turn valve supplied with the Wt. or a distribution tapstand (there are 2
stands, each with 6 taps in the MSF "Distribution tapstand" kit).
- Install a
drainage system around the platform and around the distribution point to avoid
rapid deterioration of the site.
Key
1. Reservoir (bladder tank)
2. Filling opening with cap
3.
Outlet valve
4. One half of a DN50 connection, Guillemin system
5.
Groundsheet
6. 6m of 2" reinforced hose, DN50, suitable for carrying drinking
water
7. Harness for transport by car or lorry
8. Serflex collars for grip
and watertightness
9. Spanner for loosening and tightening the hose
connections
10. 1/4 turn distribution valve
11. Corner protection plate
Inputs
- 2 people per kit for installation
- Means of firing:
motorpump, lorry tanker, etc.
- Distribution points, e.g. MSF tapstand kits
with 6 taps
Important
- Site the distribution point as far away as possible from the
tank.
- Do not lose the connection spanner: if it does get lost, there are
some in the
MSF water supply tool kit (white bucket).
- After use, it is
essential to dean and dry the inside of the tank before repacking, to extend its
life:
· open the valve and the firing cap,
· unscrew the
plastic corner reinforcing plates on one side of the tank, push a piece of
string or wire,
· between the plates and retighten them,
· hang
up the tank by the string or wire,
· slip a piece of wood (for example)
between the filling opening and the tank bottom to keep the inner surfaces apart
and let air circulate inside.
- Do not fold up the tank until the inside is completely dry (2
- 3 days at least).
- To repair the tank, use the repair kit supplied and
follow the instructions carefully.
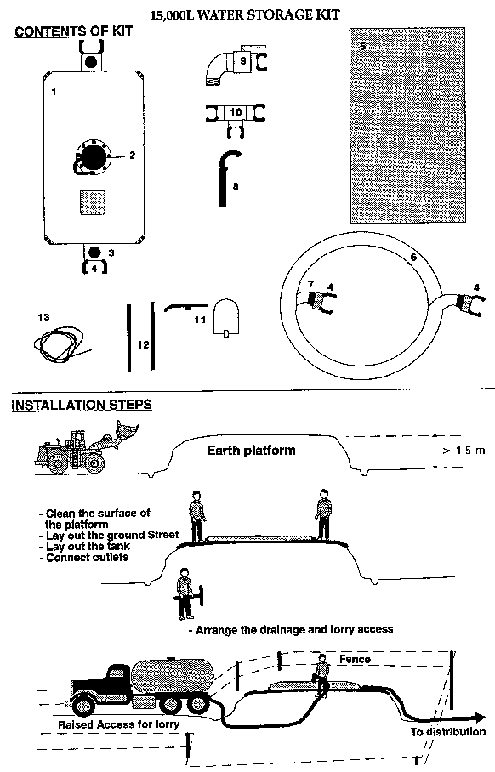
15,000 litres water storage kit
Method
This kit is designed to supply water in a camp. Once the base has been prepared (a raised earth platform), the bladder tank can be operational in a few minutes.
Installation
- Choose the site for installing the tank, ensuring that it is accessible at all times for filling the tank (e.g. by lorry tanker).
- Prepare a flat platform, about 1.5 m high so that the water may be distributed by gravity. The higher the platform the better the distribution.
- The surface of the platform should be cleared of all objects (stones, sticks, etc.) which could puncture the tank. If possible, cover the surface with a layer of sand.
Important: the area of the platform should be larger than that of the tank (6.4 m x 3.2 m). Note also that this platform should be strong enough to support 730 kg/m3.
The platform may be made of compacted earth, or oil drums filled with stones or earth with earth packed between them, or a flat roof may be used, etc.
- Spread the groundsheet on the platform.
- Lay the tank out
on the groundsheet.
- Tighten the outlet valves; they are not completely
screwed on by the manufacturer.
- Attach one of the three lengths of pipe to
one of the outlets; fit the tee and the two other lengths of pipe to the other
outlet.
- Organise the distribution points, using either the 1/4 turn valves
supplied with the kit, or distribution tapstands (there are 2 stands, each with
6 taps in the MSF "Distribution tapstand" kit).
- Install a drainage system
around the platform and around the distribution point(s) to avoid rapid
deterioration of site.
Key
1. Reservoir (bladder tank)
2. Filling opening with cap
3.
Outlet valves (2)
4. Half of a DN50 connection, Guillemin system
5.
Groundsheet
6. 6 m of 2" reinforced hoses, DN50 (3), suitable for use with
drinking water
7. Serflex collars for grip and watertightness
8. Spanner
for loosening and tightening the hose connections
9. 1/4 turn distribution
valves (3)
10. 2" tee connection, DN50
11. 2 shovels, 2 picks
12.
Handles for shovels and picks
13. Roll of rope
Inputs
- 2 persons per kit for installation
- Unpack the shovels and
picks first of ale to prepare the platform. If mechanical equipment (e.g. a
bulldozer) can be used it is much quicker and easier.
- Means of filling:
motorpump, lorry tanker, etc.
- Distribution points, e.g. MSF tapstand kits
with 6 taps.
Important
- Site the distribution point as far away as possible from the tank Use the rope in the kit for fencing.
- Do not lose the connection spanner: if it does get lost, there are some in the MSF water supply tool kit (white bucket). When rationing water, the gate valves on the outlets may be closed and the knobs taken off. Be careful not to lose the knobs.
- After use, it is essential to clean and dry the inside of the tank before repacking, to extend its life:
· open the valve and the filling cap,
· unscrew the
plastic corner reinforcing plates on one side of the tank, push a piece of
string or wire between the plates and retighten them,
· hang up the tank
by the string or wire,
· slip a piece of wood (for example) between the
filling opening and the tank bottom to keep the inner surfaces apart, and let
air circulate inside.
- Do not fold up the tank until the inside is completely dry
(2-3 days at least).
- To repair the tank, use the repair kit supplied and
follow the instructions carefully.
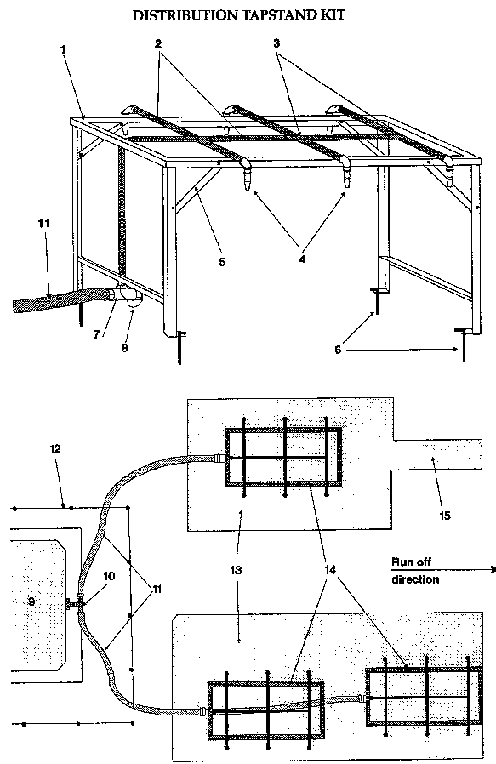
Distribution tapstand kit
Method
The distribution tapstands are pre-assembled and quick to install, allowing rapid provision of water distribution points in emergency situations. The kit is composed of 2 tapstands, each with 6 self-closing taps. The tapstands are designed to be used with the water storage kits (or any other system fitted with DN50 connections).
Installation
- Unpack the two tapstands from the box and identify the various parts (frame, taps, nuts and bolts, etc.).
- Unfold the legs and assemble the frame with the 4 steel braces. Use the bolts and the Nylostop M10 nuts with the 10mm spanner in the kit.
- Secure the reducing tee with its vertical pipe for incoming water. Use Teflon tape (PTFE) on the thread before screwing on the elbow to ensure a watertight joint. Tighten the nuts fixing the pipe to the frame with the 13mm spanner supplied.
- Wind teflon tape onto the threaded ends of the pipes on the
tapstand.
- Attach the 6 Taflo taps, tighten them well (use a wrench supplied
in the water supply tool kit). Make sure all 6 taps are vertically aligned.
-
Choose the site to install the tapstand(s): the site should be well drained (for
rainwater and wastewater) and accessible for users.
- Position the
tapstand(s). Fix them to the ground using the short stakes in hard earth and the
long stakes in soft earth.
- Connect &e tapstand(s) to the tank using 2"
Heliflex pipe. Tighten the DN50 connections well using the spanner. Bury the
pipe if possible.
- To connect 2 tapstands in series, undo the stopper from
the reducing tee on the first tapstand and attach one end of a 2" Heliflex pipe.
Connect the other end to the reducing tee of the second tapstand.
- Pave the
area with stones and dig a drain for wastewater.
Key
1. Frame and bolted legs (angle steel)
2. Galvanised steel
pipe, 3/4'
3. 1 tee, 2 crosses, 1 elbow for connections
4. 6 Taflo
(Talbot) taps
5. Steel braces
6. 4 short stakes or 4 long stakes for
anchorage
7. 2" to 3/4" reducing tee for connecting the tapstand
8.
Stopper and chain, DN50 connection fitting
9. 15 m3 or 2 m3 bladder
tank
10. 2" outlet valve and tee
11. 2" Heliflex pipe
12. Fence (posts
and ropes)
13. Paved and drained area
14. Distribution tapstands
15.
Drain for wastewater
Inputs
- 2 people for assembly and installation
- Bladder tank for
supply
- 2" Heliflex pipe
- 1 pipe wrench
- 1 connection spanner
-1
large hammer or mallet for driving in the stakes
- Enough stones to complete
the drainage works
Important
- It is important to arrange the area around the taptstands well (access, drainage), to avoid mud and stagnant water.
- If several tapstands are to be installed at the same place, separate them enough to avoid pushing and shoving at busy times.
- The 15 m3 tank has 2 outlet valves, so it is possible to install a tapstand at each end to have two distinct distribution points.
- The Taflo self-closing taps are designed to work at very low pressures. A flow of about 10 l per min at each tap may be obtained with a fall of between 1 and 1.5 m between the tank and the taps. In any case this difference in height is recommended as a minimum.
- To have a good flow to all taps, do not place more than 2
tapstands in series.
- Check from time to time that the taps close properly.
Solid particles in the water or objects inserted by users may obstruct or
prevent closure.

Motorpump kit
Method
The diesel and petrol motorpump kits are packages designed for providing water in emergency situations. They permit water to be pumped from a water source (well, river, etc.), to a water tanker or a reservoir.
Installation
- Choose the pumping site: it should be easily accessible in all seasons and not liable to flooding, particularly where the pump is to be used for filling water tankers.
- Prepare the site so as to install the pump as close to the source as possible, to reduce the suction head.
- Lay the suction pipe on a rising slope (avoid dips), making sure the connections are well tightened. An air leak through the connections could mean losing the priming of the pump. The total suction head should be limited to 7 m.
- Fit the strainer and footvalve at the lower end of the suction pipe. Attach a float so as to hold the strainer 30 cm below the water surface (to avoid creating eddies and sucking air) and at least 50 cm above the bottom (to avoid sucking in mud).
- Lay the delivery pipe(s) up the slope towards the reservoir or tanker filling point.
- Fill the pump engine with oil. New motor pumps are delivered without engine oil in the engine.
- Check the general condition of the motorpump. Fill up with fuel. The air filter of the diesel motorpump is an oil bath type; fill it according to the instructions provided
- Fill the pump body with water. The motorpumps in the kits are self-priming so there is no need to fill the suction pipe to encourage priming.
- Start up the pump, following the user's manual
- Record pumping times in the maintenance book to keep a count of pumping hours and plan the engine maintenance schedule.
Key
1. Float
2. Strainer with non-return foot valve (to exclude
large impurities and keep the suction pipe full of water when pumping
stops)
3. Water source (river, well, etc.)
4. Heliflex suction pipe, 2"
(do not use ordinary flexible hose for the suction pipe)
5. Petrol or diesel
motorpump
6. Non-return valve (protects against water hammer from
backflow)
7. Heliflex delivery pipe, 2"
· Hs: suction head / Hd: delivery head
Inputs
- 2 people to install the kit
- 1 operator for operation and
maintenance
- Shovels and picks for preparing the site
- Fuel (petrol or
diesel) and motor oil
- Reservoirs or water tankers for filling
Important
- The petrol motorpump kit is light, and suitable for mobile use for limited pumping times (e.g. on a pickup or a water tanker). Maximum delivery: 30m3/hour.
Total pumping head (suction + delivery): 28 m. Fuel capacity:2.5 l giving 3 hours running.The motorpump is mounted on a frame and weighs 28 kg. The 4-stroke engine is fitted with a low-oil security system.
- The diesel motorpump kit is suitable for fixed installations and for long pumping hours. The maximum delivery is 40 m3/hour. The total pumping head is 28 m.
The fuel capacity is 4.3 l which gives 4 hours running. The motorpump is mounted on a trolley and weighs 58 kg.
Warning: the diesel engine does not have an oil level security system; check the oil level every day before starting up.
- Every motorpump kit is supplied with 4 lengths of 2" Heliflex pipe, 1 strainer, 1 non-return valve, 1 float for the strainer, 1 20 l jerrycan for fuel, 1 can of engine oil, 1 funnel, 1 tool kit with spare parts for normal survives, a user's manual and a maintenance logbook.
- The recommended conditions of use and the maintenance practices should be followed (pumping hours, frequency of oil changes, etc.), so as to avoid breakdowns which might interrupt an emergency water supply.
- Where the motorpump is to be used for long periods in a fixed position, shelter it from the weather.
- The kit is a complete unit. Its component parts should not be separated. The whole kit should be repacked in its original case if it is to be stored again or sent elsewhere.
