Instruction Example 6.2.: Laying of Mated Surfaced Deals
In this instruction example the laying of mated surfaced deals
is practised - a technique which is applied in buildings of secondary
importance, such as sheds, lofts etc.
Material
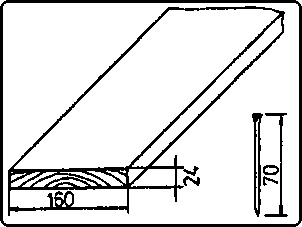
- Surfaced deals, mated
Thickness: 24 mm
Width: 120-160 mm
Length: 4000 mm
- Countersunk head nails
Thickness: 3.1 mm
Length: 70 mm
Figure
Tools
Hand saw with a tooth form suited for cross cuts, hammer, axe,
plane, chisel, nail punch
Measuring and testing means
Folding rule, pencil, flat or try square
Auxiliary accessories
Trestles approximately 600 mm high, deal cramps or steel cramps,
wooden wedges and pieces of planks
Required basic knowledge
Measuring, sawing, chopping, planing, nailing
|
Sequence of operations |
Comments |
|
1. Arranging the workshop place, putting the trestles for
supporting the deals in place, preparing materials and tools. |
Check the tools for completeness, test the keenness of the
cutting tools.- |
|
2. Measuring the room at several points across the beams. |
Check whether or not all the lengths measured are the same.
|
|
3. Transmitting the determined length, less 10 -15 mm for an
edge strip, on the deals. |
If the deals have. the length of the room, 10-15 mm are deducted
from the left and right end each for edge strips. |
|
4. Putting a square to the marking of the length, scribing and
sawing to length with the hand saw. |
If a number of deals shall be cut to the same length, they may
also be put one upon the other and sawn at a time.
The square can be put on
the pile of deals and an additional vertical marking-out line be drawn. |
|
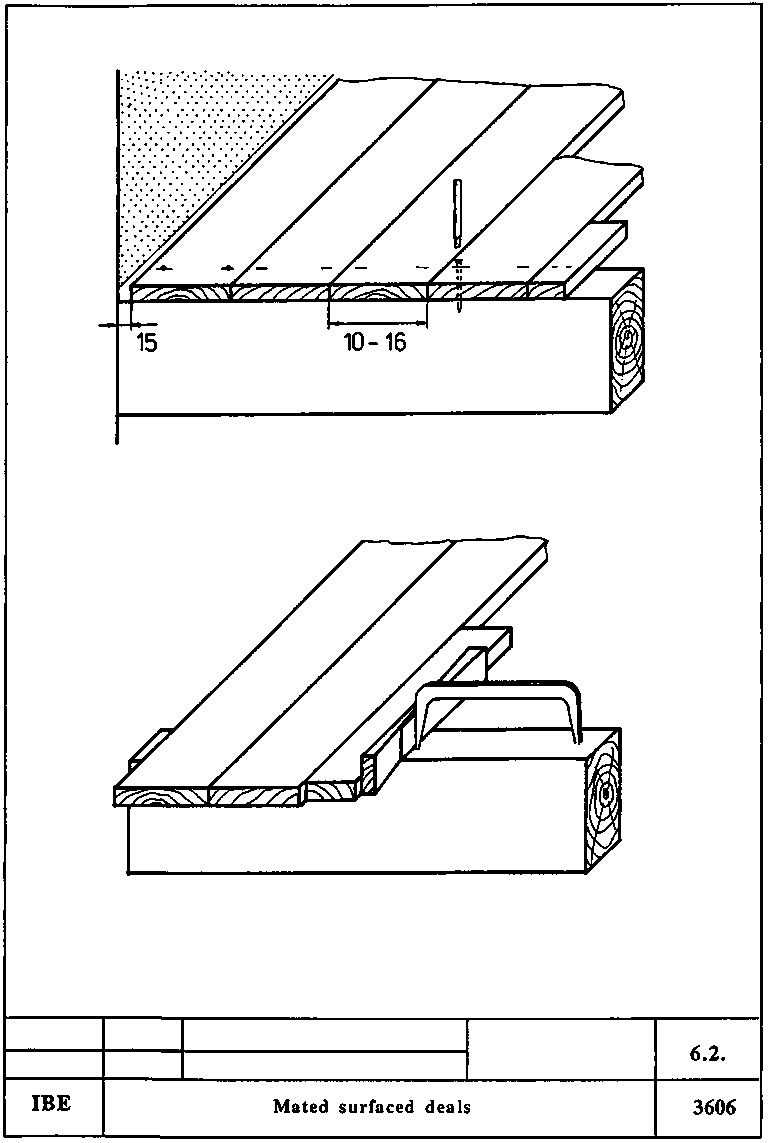
5. Laying the first deal 10 - 15 mm distant from the wall and
nailing it with two nails on each beam. |
|
|
6. Starting from the fixed deal five to six deals are put
closely together. |
The number depends also on the quality of the boards. |
|
7. Driving a steel cramp in two to three beams at a distance of
100 - 150 mm from the deals laid, putting a piece of a plank and two wooden
wedges between the deals and each cramp, tightening the wedges alternatively and
evenly with the hammer this way pressing the deals together. |
Wooden wedges are put one above the other only by their tips.
|
|
8. Drawing a thin line with lead pencil on the deals - middle of
the beam - and nailing the deals from the front - cramps - to the rear. |
Do not use a copying-pencil. The steps of work from point 6 to
point 8 have to be done repeatedly. |
|
9. For laying the last three deals measuring the space between
the deals already laid and the wall, deducting the width of two deals and 15 mm
for an edge strip from this measure, preparing the third deal according to the
required size, then putting the deals in place. Pressing them together by
driving wooden wedges between deal and wall and nailing them. |
The last deal must be sawn off or chopped according to the
required width and planed.
In order to protect the plaster of the wall
against damages, put a piece of a plank between the wooden wedge and the wall.
|
|
10. Driving in all nails two to three mm into the surface of the
deals with a nail punch. |
|
|
11. Cleaning the deals and removing superfluous material from
butts or joints with a plane. |
Before planing make sure that all nails are counter-sunk. By
smoothing a uniform and even surface is achieved. |
|
12. Final checking. |
|