Silk Screen Printing
Silk screen printing is a simple, inexpensive method of
producing multiple copies
of attractive visual aids, posters, and other materials,
including typewritten pages.
A squeegee forces very thick paint through those parts of
the silk screen that
are exposed by the stencil onto paper placed underneath the
screen. The silk-screen
process presented here is used for educators and trainers
who must
prepare their own training materials. It would require
considerable upgrading of
equipment and materials to be appropriate for commercial
painting operations.
BUILDING THE SILK SCREEN PRINTER
Tools and Materials
Hinges, about 2.5cm x 7.5cm (1" x 3")
Wing or regular nuts
Squeegee
Trigger support
Wood for frame
Baseboard or smooth table top
Silk or other sheer cloth
Thumbtacks
Silk screen paint
Paper for copies
Water-soluble paint, e.g., finger paint
(Oil-soluble paint also works well,
but a solvent is needed to clean it off the screen.)
1. Build a frame
(see Figures 1 and 2), using 1.9cm x 5cm (3/4" x 2") plywood
fg1x4050.gif (437x437)
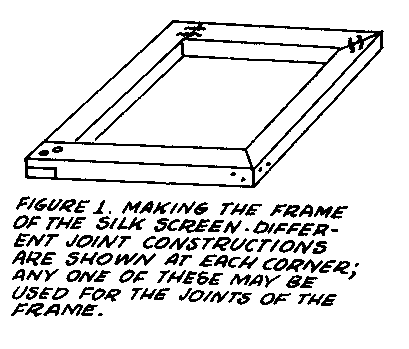
or other wood.
The frame should be big enough for the largest prints to be
made. Average
inside frame dimensions would be 38.1cm x 50.8cm (18" x 24").
Make sure that
the corners are square and the frame lies flat against a flat
baseboard or
table top. The baseboard can also be made of 1.9cm (3/4")
plywood. A few
coats of shellac on the wooden frame will make it longer
lasting and less
apt to warp.
2. Stretch the silk
very tightly over the underside of the frame, using tacks
every 2.5cm
(1"). Make sure that the threads of the silk run parallel with
the edges of the
frame, pull the silk over the outside bottom edges and tack
the silk around
the outside of the frame (see Figure 2).
fg2x406.gif (600x600)

3. Make a squeegee
(see Figure 3).
fg3x406.gif (486x486)

PRINTING
1. Cut the stencil
and attach it to the screen (see "Preparing a Paper Stencil").
2. Place the paper
or cardboard to be printed under the screen and stencil.
Draw about 10ml
(2 teaspoons) of water-soluble paint (for example, finger
paint) in a line
along the edge of the silk just inside one end of the frame.
The paint should
be thick, about like auto transmission grease, so that it
will not just
fall through the screen without being pushed by the squeegee.
3. Using an edge of
the squeegee, pull the paint across the surface of the silk.
This squeezes the
paint through all the open areas of the paper stencil. Lift
the screen and
remove the print, replacing it with the next piece to be
printed. Pull the
paint back in the opposite direction for this print. The
correct technique
is to put an amount of paint on the screen that will,
combined with the
right pressure on the squeegee, produce a good print with
one stroke of the
squeegee. <see figure 4>
fg4x407.gif (437x437)

Make sure that
the paint
contains no dried
paint
particles. They
could damage
the screen.
4. When a printing
is completed,
pull the stencil
off the screen.
Remove the wing
nuts and
wash the frame
under running
water.
5. The pieces to be
printed can be registered (lined up so that the printed
image appears in
exactly the same place on each piece). Registration guides
can be made of
thin cardboard or several layers of tape (see Figure 2).
fg2x406.gif (600x600)
Thicker guides
could break the silk when the squeegee presses the screen
against them. The
guides should be taped on the baseboard at the edges of
three sides of
the sheets to be printed.
6. If more than one
color is to be printed, registration becomes very important.
The procedure to
follow is this:
o
Print the first color, using registration
guides.
o
Wash the screen as in Step 4 above, and
attach the next stencil.
o
Place a piece of waxed paper or thin
translucent paper under the
second screen
to be printed, and tape this paper on one edge.
o
Print an image of the second screen on this
paper.
o
Raise the screen.
o
Slide a sample of the first printing into
position beneath the taped
paper. Adjust
the sample so that the second image will appear in the
right place on
the pieces already printed.
o
When the sample is lined up, carefully hold
the first printing sample in
position and
remove the wax paper.
o
Tape new registration guides on three sides
of the sample.
o
More colors can be printed by returning to
Step 6.
7. Several colors
can be printed over one another if transparent paints are
used.
8. A drying rack
(see Figure 5) is helpful when many prints are to be dried.
fg5x408.gif (600x600)

Source:
John Tomlinson, VITA Volunteer, Rochester, New York
PREPARING A PAPER STENCIL
This method of preparing a stencil for silk screen printing
is more versatile for
some effects than the usual stencil technique: for example,
the letter "O" can be
formed without connecting lines to hold the center in place.
But the method has
these limitations: Images must be bold and simple designs.
The stencil will last for
only a few hundred impressions; will not hold up with
water-base paint; and
cannot be stored.
Tools and Materials
Stencil paper--Somewhat-transparent white bond paper works
well. Commercial
stencil paper can be used, but the edge of the printing may
be fuzzy. Thick paper
leaves a thick layer of paint when the squeegee draws the
paint across the
screen.
Mimeograph stencils can be used to reproduce typing.
Stencil knife
A small-blade knife with a handle about as thick as a
pencil.
To prepare and use the paper stencil, follow these steps:
o Place the stencil
paper over the image to be reproduced and fasten both to
a hard level
surface, like the baseboard of the silk screen.
o Trace the design
and then cut around the areas where one color is to be
printed. Press
just hard enough to cut through the stencil paper without
cutting the
original. Do not strip the cut-out parts away yet; leave the
stencil intact.
o Put a pad of
newspaper on the baseboard of the silk screen so that when
the screen is
lowered it will hit the stencil firmly.
o Place the stencil
on this pad in the position desired. Slip several pieces of
tape, sticky side
up, under the edges of the stencil; this will tape the stencil
to the screen when
the screen is lowered. Mask the open areas of the
screen beyond the
edges of the stencil.
o To make the
stencil stick to the screen, draw paint across the screen with
the squeegee.
o Remove the cut-out
parts of the stencil.
o At the end of the
printing run, peel the paper stencil and masking from the
screen. Clean the
screen.
A mimeograph stencil is prepared as it would be for a
mimeograph machine.
Attach it to the screen the same way a paper stencil is
attached.
Source:
Mrs. Benjamin P. Coe, VITA Volunteer, Schenectady, New York
MAKING SILK SCREEN PAINT
The paints described here for silk screen printing should
have a shelf life of
several months when they are stored in jars with
tight-fitting lids. The recipes
have been tried successfully in a temperate climate. Paints
colored with powdered
tempera are more brilliant than those colored with food
colors or ink. Other
water-soluble dyes can probably be used also.
Materials
Starch or cornstarch
Soap Flakes
Gelatin (optional)
Coloring matter (food color, tempera powder, ink, or a dye
of some sort that is
water soluble)
Recipe #1
Linit starch (not instant) 115 ml (1/2 cup)
Boiling water 345ml (1 1/2 cup)
Soap flakes 115ml (1/2 cup)
Mix starch with enough cold water to make a smooth paste.
Add boiling water
and cool until glossy. Stir in soap flakes while mixture is
warm. When cool, add
coloring.
Recipe #2
Cornstarch 57.5ml (1/4 cup)
Water 460ml (2 cups)
Soap flakes 29ml (1/8 cup)
Bring water to a boil. Mix cornstarch with a small amount of
cold water and stir
the two together. Bring, to a boil and stir until thickened.
Add soap flakes while
warm. Color.
This recipe produces paint that seems quite lumpy but this
does not affect the
printing quality.
Recipe #3
Dissolve 115ml (1/2 cup) cornstarch in 172.5ml (3/4 cup)
cold water
Dissolve 1 envelope gelatin (15ml or 1 tablespoon,
unflavored) in 57.5ml (1/4 cup)
cold water
Heat 460ml (2 cups) of water, pour in cornstarch. Add dissolved
gelatin. Boil, and
stir until thickened. Cool and add 115ml (1/2 cup) soap
flakes. Color.
NOTE: Adding 5 to 10ml (1 to 2 teaspoons) of glycerine to
any of these
recipes will make the paint easier to use.
Never let dried particles of paint get mixed into the paint
or fall onto the screen
because they may puncture the silk during the printing. A
small hole in the silk
can be repaired with a small drop of shellac.
Source:
Mrs. Benjamin P. Coe, VITA Volunteer, Schenectady, New York
Inexpensive Rubber Cement
Inexpensive rubber cement can be made easily with ordinary
gasoline and raw
sheet rubber.
Imported pastes are often expensive. Many of these are not
good for mounting
pictures and similar materials; they soak through the paper
and wrinkle both the
picture and the mount.
Rubber cement does not wrinkle the pieces to be joined. It
has another advantage:
if it smears, it can be rubbed off with the fingers when it
is dry.
Tools and
Materials
Ordinary gasoline: 250cc (16 ounces)
Raw sheet rubber in one piece:
5gm (115 ounce)
Jar with lid
Stirring rod
Brown bottle
(*)Tin can
(*)Charcoal
(*)Small pieces of cloth
_________________
(*)Needed only if gasoline is colored.
* * * CAUTION * * *
Gasoline will
burn and explode, and the vapors can be a
health hazard. Be
careful when mixing or applying the
cement. Do not
inhale the gasoline vapors. Make the rubber
cement in a
well-ventilated place.
The rubber to be used should be a translucent, light-brown
sheet. Any brand of
gasoline can be used. Some gasolines are highly colored.
This coloring should be
removed so that the rubber cement will not stain when it is
used. To remove the
coloring, pour the gasoline over common charcoal several
times (see Figure 2).
Use a clean tin can with a hole in
the bottom. Put a small piece of
cloth in the bottom of the can to
keep the charcoal from falling into
the filtered gasoline. You may have
to change the charcoal several
times before the gasoline is clear.
Put the 5 grams (1/5 ounce) of raw
sheet rubber in a jar and pour in
the 250cc (16 ounces) of ordinary
gasoline (see Figure 1). Cover the
jar.
It takes about three days for the rubber to dissolve
completely in the gasoline.
Stir the mixture several times during this period,
especially when the mixture
becomes thick. If some of the rubber does not dissolve, more
stirring will break it
up. When the rubber is dissolved, you will have a smooth,
milky-colored cement.
To store the rubber cement, it is best to use a brown bottle
because the cement
will become thin if it is exposed to sunlight for a long
time.
Mark the bottle:
DANGER: EXTREMELY FLAMMABLE,
HARMFUL OR FATAL IF SWALLOWED
The cement should be kept in a ventilated cupboard when it
is not being used.
To make a handy dispenser for the
cement: Cut a hole in the cover of
the jar, large enough for the
handle of a 2.5cm (1") brush (see
Figure 3). Push the handle through
the hole and leave the brush in the
jar. This should be airtight because
the cement hardens quickly when
exposed to air.
Source:
Bunyard, Robert J. "Rubber Cement in a Tropical
Climate," The Multiplier, Vol. 2,
No. 6, July 1956.

