Back to Home
Page of CD3WD Project or Back to list of CD3WD Publications
 |  |  | Setting-up and Operating of Regular Engine Lathes - Course: Techniques for machining of material. Trainees' handbook of lessons (Institut für Berufliche Entwicklung, 35 p.) | |  | (introduction...) | | | 1. Importance of the regular engine lathe | | | 2. Structure of the regular engine lathe | | | 3. Structure and types of lathe tools |  | | 4. Preparation of the work on the regular engine lathe | | | 5. Setting-up and operating the regular engine lathe | | | 6. Maintenance and care of the regular engine lathe |
|
4. Preparation of the work on the regular engine lathe
Possibilities of tool clamping
Lathe tools must be firm and safetly clamped. Insufficient
clamping may lead to rejects or accidents. By the clamping claw or the lathe
tool holder, the lathe tool is fixed well even with difficult cuts.
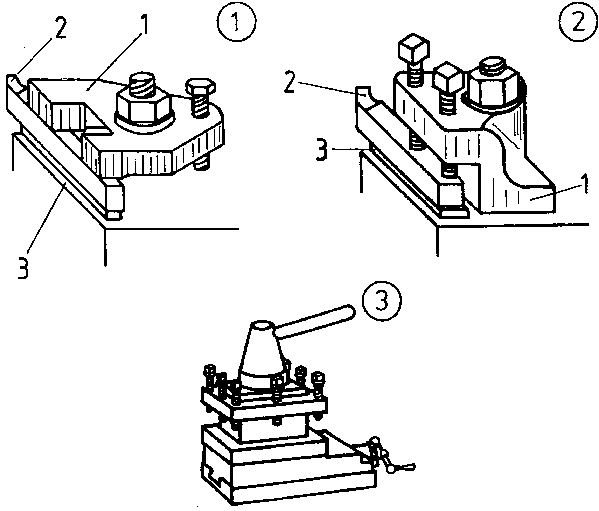
Figure 19. Clamping possibilities of
the lathe tool
 clamping jaw;
  lathe tool holder;
  rotatable fourfold
lathe tool holder
rotatable fourfold
lathe tool holder
With the help of the quadruple lathe tool holder, up to four
lathe tools can be set up for the respective work.
Thus, the clamping and unclamping of the lathe tools and the
work-pieces for the individual operations is no more necessary. As soon as a new
workpiece shall be worked, the hand lever is unlocked, the tool holder is turned
and the lever is tightened again with the exact position of the individual lathe
tools being secured by an index.
|
Clamping must be firm and safe. Insufficient clamping may cause
rejects, breaking of the lathe tools and accidents. |
Pay attention to the following points:
- The lathe tool must always be in dead central
position (centre of the tailstock/setting gauge).
- Height adjustment by sheet metal backings (must be accurately
plane and clean; use a few thick backings instead of many thin ones; the length
should be at least three quarters of that of the tool shank).
- Do not adjust the height by placing sheet metal under the rear
end of the lathe tool.
- Use of the quadruple lathe tool holder.
The multiple-cutting edge boring tools are put by their taper
shank into the machine taper of the tailstock spindle.
Then, they are advanced towards the workpiece which is rotating
with the work-driving spindle with the help of the hand wheel.
If the external taper of the drill and the internal taper of the
quill do not match, the difference - if the internal taper is larger - can be
balanced by reducing sleeves.
External and internal tapers must be absolutely clean, otherwise
the drill rotates in the quill and destroys the internal taper.
In addition, it would, in such case, not be at centre with the
rotation axis.
Larger drills are protected against the above mentioned kind of
rotation by putting on a work driver.
Small drills are clamped in the drill chuck, which, then, is put
into the quill by its taper shank.
In some cases, the automatic feed is used for moving the boring
tool forward. For this purpose, the drill is clamped on the carriage with the
help of a holding device.
Drill axis and rotation axis must be accurately congruent.
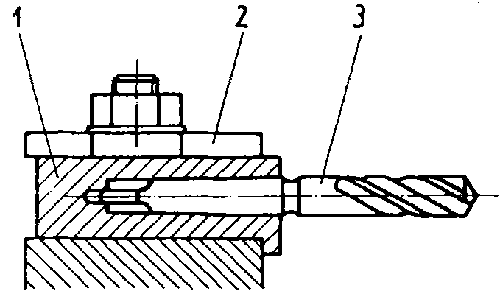
Figure 20. Boring block
1 boring block, 2 lathe tool holder, 3 twist
drill
Possibilities of clamping the workpieces
The three-jaw chuck serves for clamping short workpieces
quickly, safely and centrically.
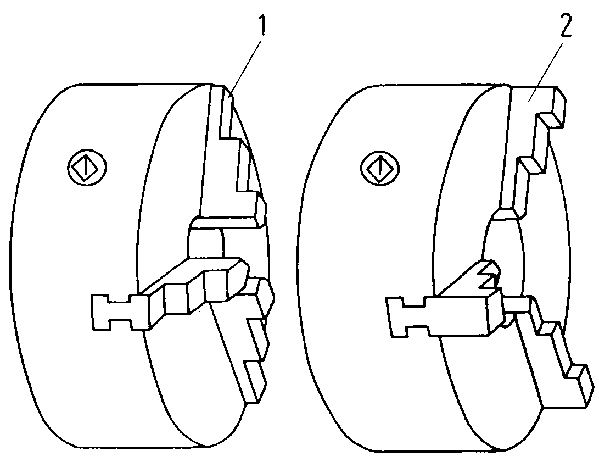
Figure 21. Three-jaw chuck
1 three-jaw chuck with turning jaws, 2 three-jaw
chuck with boring jaws
With the help of the four-jaw chuck, quadrangular and octagonal
parts are clamped.

Figure 22. Four-jaw chuck
In order to achieve an exact true running of the parts, soft
gripping jaws are used which are bored true to size of the respective
workpieces.
Small, irregularly shaped workpieces are often clamped in the
four-jaw chuck with individually adjustable chuck jaws.
They can be quickly aligned. The chuck jaws can be moved in
common as well as individually,
For clamping smaller workpieces and for working from the bar,
especially on turret lathes and automatics, the collet chuck is used.
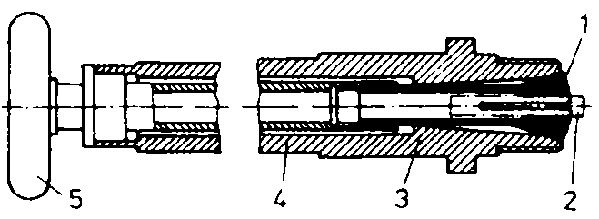
Figure 23. Collet
1 clamping body, 2 workpiece, 3 lathe spindle, 4
clamping tube, 5 handwheel
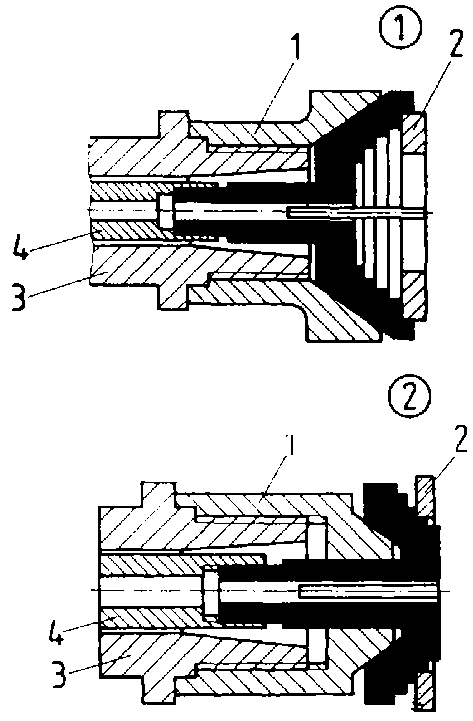
Figure 24. Step chuck
internal step chuck; external step chuck
1 basic chuck, 2 workpiece, 3 lathe
spindle, 4 clamping tube
Large, flat bodies of revolution such as disks and lids but also
square and rectangular as well as irregularly shaped workpieces are - nearly
without exception - are clamped flying on faceplates.
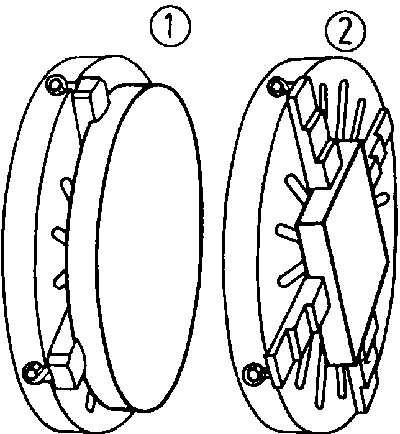
Figure 25. Faceplate
clamping of large
disks
clamping of square workpieces
A very economical method of clamping is that on the mandrel,
which is also called expansion arbor. It is put into the cleaned internal taper
of the lathe spindle.

Figure 26. Arbor
1 clamping body, 2 taper plug, 3 workpiece, 4 lathe
spindle
Premanufactured arbors can be adapted to various diameters by
the lathe operator himself. They are especially suited for clamping levers and
other irregularly shaped parts with a bore hole and save the use of complicated
fixtures.
Other methods of clamping may be applied according to each
respective kind of workpiece.
Clamping mistakes and their causes
Frequent clamping mistakes are:
- Too long projecting of the lathe tool - lathe tool is springy.
- Wrong setting-up at centre by too many backings and/or
non-aligned backings - this causes chattering, canting, tool breaking,
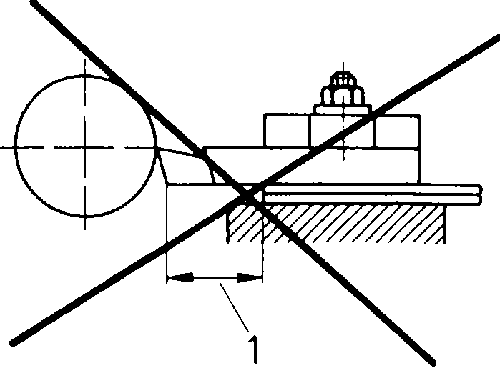
Figure 27. Lathe tool too much
projecting
1 wrong clamping
- Inclination of the lathe tool due to overraised shank the
consequences are: displacement of the cutting edge angles, the spindle of the
clamp nut is tightened in an oblique way.
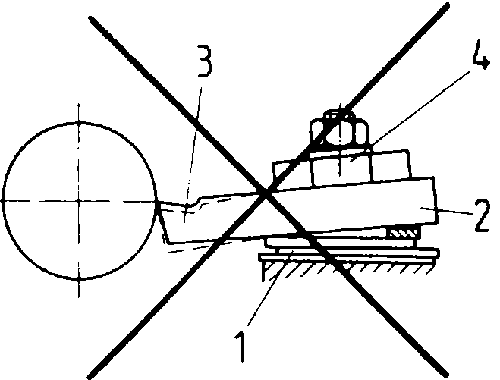
Figure 28. Wrong setting at centre
1 too many backings, 2 inclined position of the
lathe tool due to overraising of the shank, 3 distortion of the cutting edge
angles, 4 spindle of the clamping nut not straight
- Wrong position of the clamping jaw and/or locking screws: the
lathe tool is fixed only by one edge - the service life of the tool is reduced.
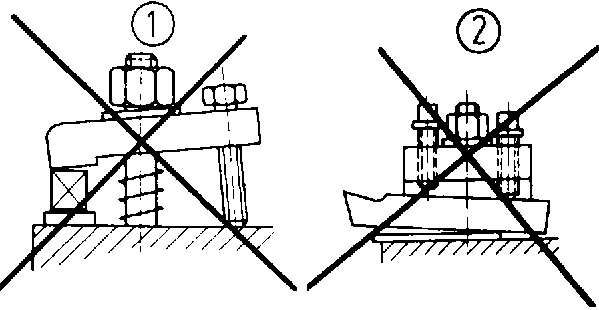
Figure 29. Wrong position of the
clamping claw/clamping bolts
clamping claw; clamping bolts
- Wrong position of the lathe tool: The tool is forced into the
workpiece - risk of rejects.

Figure 30. Wrong position of the
roughing lathe tool
1 arrow points to the direction in which the tool is
forced into the workpiece, workpiece becomes a reject
- Unclean quill: Foreign matters are between the tapers, which
leads to rejects and tool breaking.
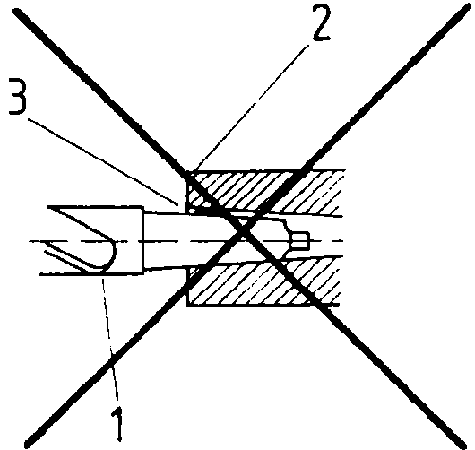
Figure 31. Foreign matters between
the tapers
1 twist drill, 2 quill, 3 foreign
matter
- Too much projecting of the workpieces and/or unsufficient
fitting to the clamping jaws - tool breaking due to chattering.
Rejects are also caused by canting of the workpiece.
Risk of accident when loosening the workpiece.
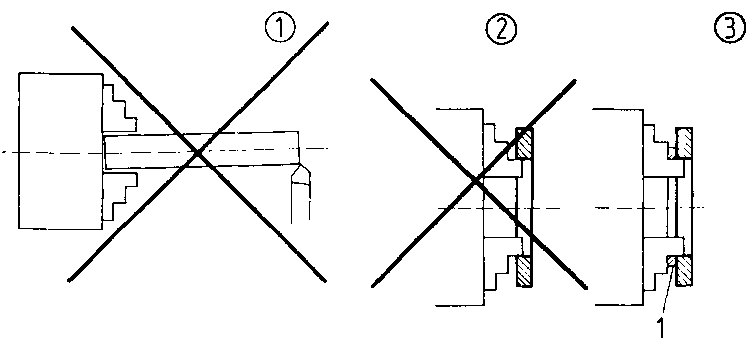
Figure 32. Workpiece projecting too
much/ill-fitting clamping jaws
too much projecting; thin workpieces clamped the wrong way;
thin workpieces are clamped against a supporting ring
1 supporting ring
How can workpieces be
clamped?
_________________________________
_________________________________
_________________________________
What is the purpose of clamping in soft clamping
jaws?
_________________________________
_________________________________
_________________________________
Determination of the settings (cutting values)
The settings (cutting values) resulting in the best possible
economy can be determined only for one definite turning operation on one certain
lathe. Cutting speed “v”:
The speed v is the distance s covered in one unit of time, i.e.

The distance s can be expressed by any unit length, e.g. in mm
or in m or in km. The unit of time forming the basis of the measurement of the
speed can also be chosen in any measure of time, for instance in h (hours), in
min (minutes) or in s (seconds).
For the purpose of a uniform determination of the cutting speeds
in the turning process, the distance s is expressed in m and the time t in min.

The same applies to boring, counterboring, reaming, milling,
broaching, planing, slotting and shaping, for which the cutting speeds are
always given in m/min.
Pay attention to the fact, that sometimes cutting speeds are
given in m/s, though.
If a workpiece completes one full rotation about its axis and if
the diameter of this workpiece is d, each individual point on its surface covers
a distance of
s = d x p
If the same workpiece does not rotate only one time but n times
about its axis, the distance each individual point of its surface covers is n
times as long, i.e.
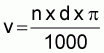
s = n x d x p
Since the diameter d enters this equation in mm, but the
distance s shall be determined in m (1 m = 1000 mm), the equation reads as
follows:

If the same workpiece again rotates n times about its axis, and
if these n rotations are completed in exactly 1 min, it has the rotational speed
of n per minute or n/min, which can also be written as follows: n 1/min or n
r.p.m.
The latter way of writing is used to indicate rotational speeds.
Since with the number of rotations completed in one minute the
unit time of min has entered the equation, we now have no more just the distance
s, but the distance s covered in one minute, that is to say, we are now dealing
with a speed v.
Thus, the equation reads like this:
For example:
A workpiece of a diameter of d = 200 mm rotates along the lathe
tool at n = 30 r.p.m. What is the peripheral speed v?

The peripheral speed of the workpiece, at the same time, is the
speed at which the turning is removed, i.e. the cutting speed.
Rotational speed “n”: As is to be seen, there care
certain relations between the cutting speed v, the diameter d and the rotational
speed n.
A certain diameter and a certain cutting speed result in:

|
n |
v |
d |
p |
|
r.p.m. |
m/min |
min |
- |
For example:
A disk of Ř 200 mm shall be rough-machined at v = 100 m/min. The
rotational speed n is to be determined.
|
Given: d = 200 mm, v = 100 m/min |
|
Required: n = r.p.m. |
|

|
|
159 r.p.m. |
In planning pay attention, that the cutting speed, when reaching
the centre, moves towards 0, i.e. the mean diameter is used for calculation.
With individual parts, a greater diameter may be chosen. With
series, a smaller one may be taken in order to avoid frequent regrinding and
setting-up.
Time is saved this way.
Cutting depth “a”:
The cutting depth a in mm is the amount by which the lathe tool
is fed before beginning a cut.
If possible, the entire machining allowance shall be removed in
only one roughing and one finishing operation. With plain turning, it is
calculated from the raw diameter dr and the final diameter d of the
workpiece according to the following equation:

Feed “s”:
The feed, or better feeding distance s in mm is the progress of
the lathe tool is the direction of the cutting movement after one rotation of
the workpiece. It is selected from the in-feed scale of the lathe, which is
determined by the feed gear, according to the proportion a : s.
By the cutting depth a and the feed s, the sectional area of
chip F is determined:
F = a x s
Therefore, for an economical turning, a certain chip proportion
a : s must be observed.
With a great feed, a large quantity of chips is achieved - at
the same time, the performance of the machine is increased.
Further aspects in connection with the selection of the feed are
the surface quality and the material of the workpiece. What diameter is chosen
for the calculation of the cutting speed with
finishing?
_________________________________
_________________________________
_________________________________
What is the equation for calculating the cutting
speed?
_________________________________
_________________________________
_________________________________


