SCANNING AN IMAGE
A scanner is a hardware device that can catch images and
translate them into a digital form that a computer can display,
edit, store and output. The image may be a photo, pages
of characters, graphics and illustrations, or even coins
or textile products in three dimensions.
Therefore, scanner is able:
· To scan characters into bit identifying software
for processing, thereby avoiding the trouble of typing.
· To add graphics or photos in the document.
· To add image in multimedia.
· To produce artistic documents.
If you have a basic understanding of what a scanner can do,
you may now improve your working quality and efficiency.
Objectives
To be able to transform an image form a hard copy into an
electronic copy.
Rationale
It is important for an art student to learn how to transform
an image from a magazine, book, or a drawn/ painted 2-D Art.
Activity 1
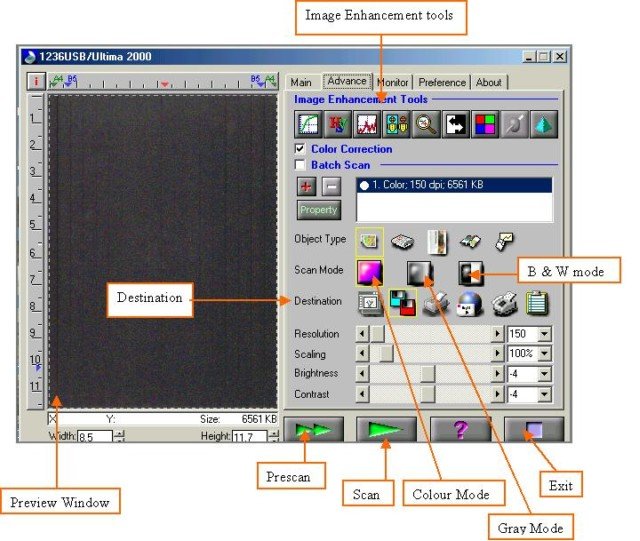
1. Place your work to be scanned in the scanner.
2. From the Start menu, choose Programs, ARTEC,
1236USB and click.

This opens the Scanner window, making it ready for you to
use it.

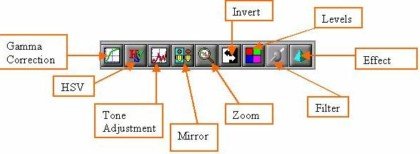
Enhancement Tools :

Gamma Correction:
Adjusts the brightness of midtones of the scanned image while
keeping shadow and highlight areas relatively unchanged. The
Gamma correction function allows you to increase or decrease
the intensity of the middle gray tones.
HSV: (Hue & Saturation)
Allows you to adjust the hue and saturation of its pixels
in an image while keeping the brightness level unchanged.
Tone Adjustment:
Allows you control the conjunction between the shadows, midtones,
and highlights of your image. Use it to restore detail that
is lost in shadows or highlights, to correct over or under-exposure,
and to improve the tonal quality of your image.
Mirror:
The mirror function lets you change the horizontal orientation
of a prescan image to one that mirrors the current orientation
of the image view across a vertical imaginary line.
Zoom:
The Zoom function lets you enlarge the view of an image in
the Preview window. However, the zoom function can only enlarge
the image view with one predefined factor.
Invert:
The Invert function enables you to make a positive view of
a scanned image negative or to make a negative image positive.
By applying this function, the brightness value of each pixel
will change to an inverse value on 256-color scale.
Filter:
Filters are provided to produce dropout effects, i.e., to
drop the part of the image that is in a color difference from
the specified filter. Three options are available: Red, Green,
and Blue filter.
Effect:
Offers the ability to create special and spectacular effects
to your scanned image and let you get some amazing results.
There are five functions in this menu: None, Blur, Blur More,
Sharpen, and Sharpen More. All these functions are exclusive
to each other. The default effect selection is None.

Normal: You need not select this icon if your
document is photo or better quality image.
Newspaper: For newspaper document selection.
Catalog / Magazine: For catalog or magazine
document selection.
Art Magazine: For art magazine document selection.
User Define Object: Select this icon and a dialog
box will appear. You can either enter the desired value in
the number box or use the scroll bar.
3. Click on the Prescan button to perform a prompt
low-resolution scan. The prescan image will be displayed in
the Preview window.
|
